What is the HTTP Request step?
The HTTP Request step enables you to make direct API calls to any platform that offers a public API and store the details as a reusable connection across your workflows. This means you can integrate apps and actions into your workflows that aren’t currently available in Stepper.
Stepper supports both standalone HTTP requests and making HTTP requests for selected apps.
Getting started with APIs
This feature requires a basic understanding of Application Programming Interfaces (APIs) and access to API documentation for the platform you want to integrate into your Stepper workflow.
If you are new to APIs, this is a good place to begin.
Generic HTTP Requests
The HTTP Request connection
You will need to create a connection before adding an HTTP Request step to a workflow if you haven’t already configured one. The connection stores the properties required for all requests sent to that platform, and can be used across workflows.
You can create a new connection when you add a new step to a workflow or from the Connections page by clicking 'New Connection’ in the top right and selecting 'HTTP Request’.
Stepper integrates with Paperform, but here is an example using the Paperform API:
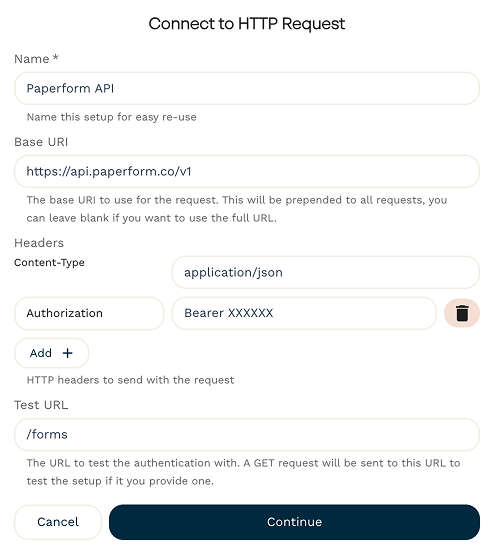
Generic HTTP Request connections include the following attributes:
- Name: A recognisable name for the connection.
- Base URI: The starting address of the API. https://api.paperform.co/v1 is an appropriate URI for the Paperform API. This means you don’t need to re-specify this for endpoint URIs in your workflows. For example, the URI to get a list of forms within a workflow would be
/forms, instead ofhttps://api.paperform.co/v1/forms. - Headers: Many APIs require specific headers for all requests, such as Authorization tokens and content types. You can store these headers in the connection so they do not need to be added in every workflow step. Paperform requires an access token, which can be generated in your developer settings.
- Test URL: You can also add a test URL to test the configuration. Stepper will send a GET request to this URL to test your connection settings.
Once saved, your HTTP Request connection will appear in your Connections list. You can select it whenever you add a generic HTTP Request step to a workflow.
Setting up the “Make HTTP Request” action
The generic HTTP Request step has a single action available when adding a step to your workflow: Make HTTP Request.
Here is an example using the Paperform API:
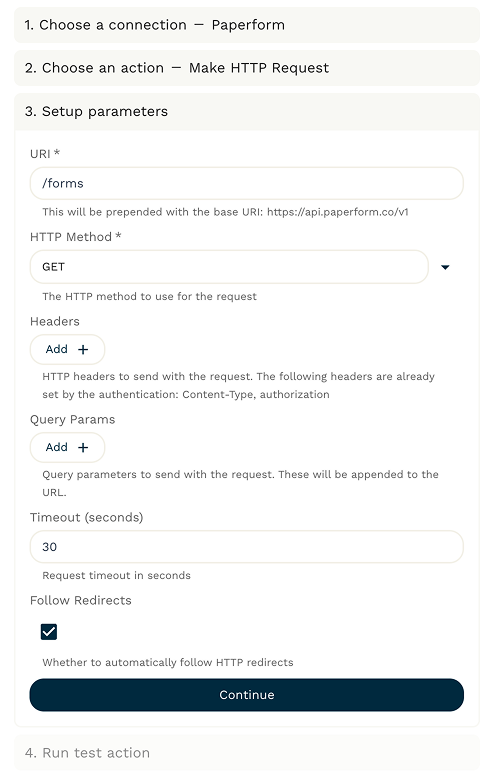
The Make HTTP Request action has the following attributes and configuration options:
URI: This continues from the base URL in your connection. In our Paperform API example, /forms can be appended to https://api.paperform.co/v1.
-
HTTP Method: Choose the method required by the endpoint. Common methods include:
- GET to retrieve data
- POST to create something
- PUT or PATCH to update something
- DELETE to remove something
-
Additional headers: You can add headers that apply only to this step, in addition to headers set in the connection configuration. This includes adding dynamic values from earlier steps.
-
Query parameters: Some endpoints allow filtering, sorting, or pagination by adding query parameters. For the Paperform
/formsendpoint, this could include the key-value pairssearch salefor forms with “sale” in the title, orlimit 20to limit the results to 20 forms. Check the documentation for the API you’re using to check what’s supported. -
Response type: Most APIs return JSON, but some may return XML, plain text, or other formats. Select the response type that matches the endpoint documentation.
-
Timeout: Set the number of seconds Stepper should wait for a reply before stopping the request.
-
Follow redirects: Some APIs redirect requests to other URLs. If this is expected, enable the option to follow redirects.
Make HTTP Request inside supported apps
Many supported apps in Stepper offer their regular triggers and actions, as well as an additional Make HTTP Request option. This version is more convenient because it utilizes the app’s existing authenticated connection, rather than requiring a separate HTTP Request connection or managing authentication manually. You can create a new connection when you add a new step to a workflow or from the Connections page by clicking 'New Connection’ in the top right corner and following the prompts to authenticate for your chosen app.
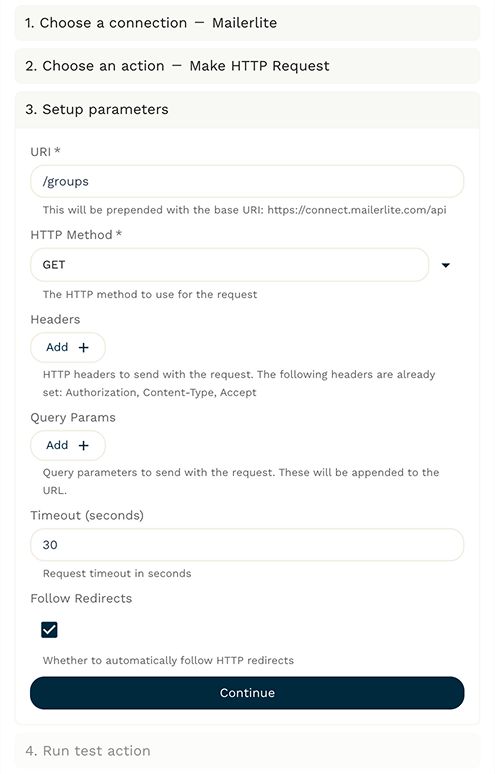
You can customize the Make HTTP Request step in the same way as configuring a generic request outlined above. When choosing the 'Make HTTP Request' action, the setup parameters step provides information on what is already configured in the connection settings, such as the base URI and headers. Here is an example of the Make HTTP Request action for MailerLite:
If you need help or inspiration, feel free to reach out to us.