What is Stepper?
Stepper is an AI-native workflow automation platform that makes it simple to create automated processes for your business.
In this guide, you will learn how to:
- Set up your first automated workflow between different apps using plain-language AI prompts.
- Make changes to your workflow directly and manually if desired, using the workspace menus.
- View the run history and troubleshoot issues, both manually and with the help of AI.
- Find your way around the Stepper Dashboard.
Workflows
What is a workflow?
A workflow is an automated series of events, made up of at least one trigger and one action.
A trigger is the first step that kicks off a workflow, and the actions are every automated step that follows. For example, let's say that you would like to automate an email that sends each time a new row is added to your Google Sheet. Your automation would need two steps:
- Trigger: new row added to Google Sheet
- Action: send an email
Each time you complete a new spreadsheet row, it will automatically kick off your new workflow in Stepper. You can also pass data from each step to the next, so your email will contain the information entered into the spreadsheet.
Many workflows only need two steps—a trigger and an action. However, Stepper can manage complex workflows with consecutive actions, branching paths, conditional logic, and even multiple potential triggers.
Creating your first workflow
To start off, let's keep things simple. Click the "Create workflow +" button in the top-right corner of the Stepper Dashboard to begin.
Prompting with AI
When you first start a workflow, you'll have the option to ask AI directly what you'd like to do. In our example, we'll keep it simple and enter the prompt:
"Send an email each time a new row is added to my Google Sheet. The email should be sent to me@example.com, and the email body should contain a summary of the information in the row."
When writing a prompt for AI:
- It's best if you have a clear picture of what you're looking for before you start prompting.
- The more specific the better. Include the names of the apps involved, a clear description of the actions needed, and any other details that you have in mind.
- Don't be afraid to write long prompts. The more thorough you are, the more that the AI has to work with, and the less likely it will be to misinterpret your goal.
Once you have entered your prompt, click the "Continue with AI →" button.
The AI conversation window
Submitting your prompt will open a new conversation window between you and the AI. Stepper will reply with an outline of the workflow to confirm that it understands the idea. You can rectify any issues here, ask clarifying questions, or just confirm its summary.
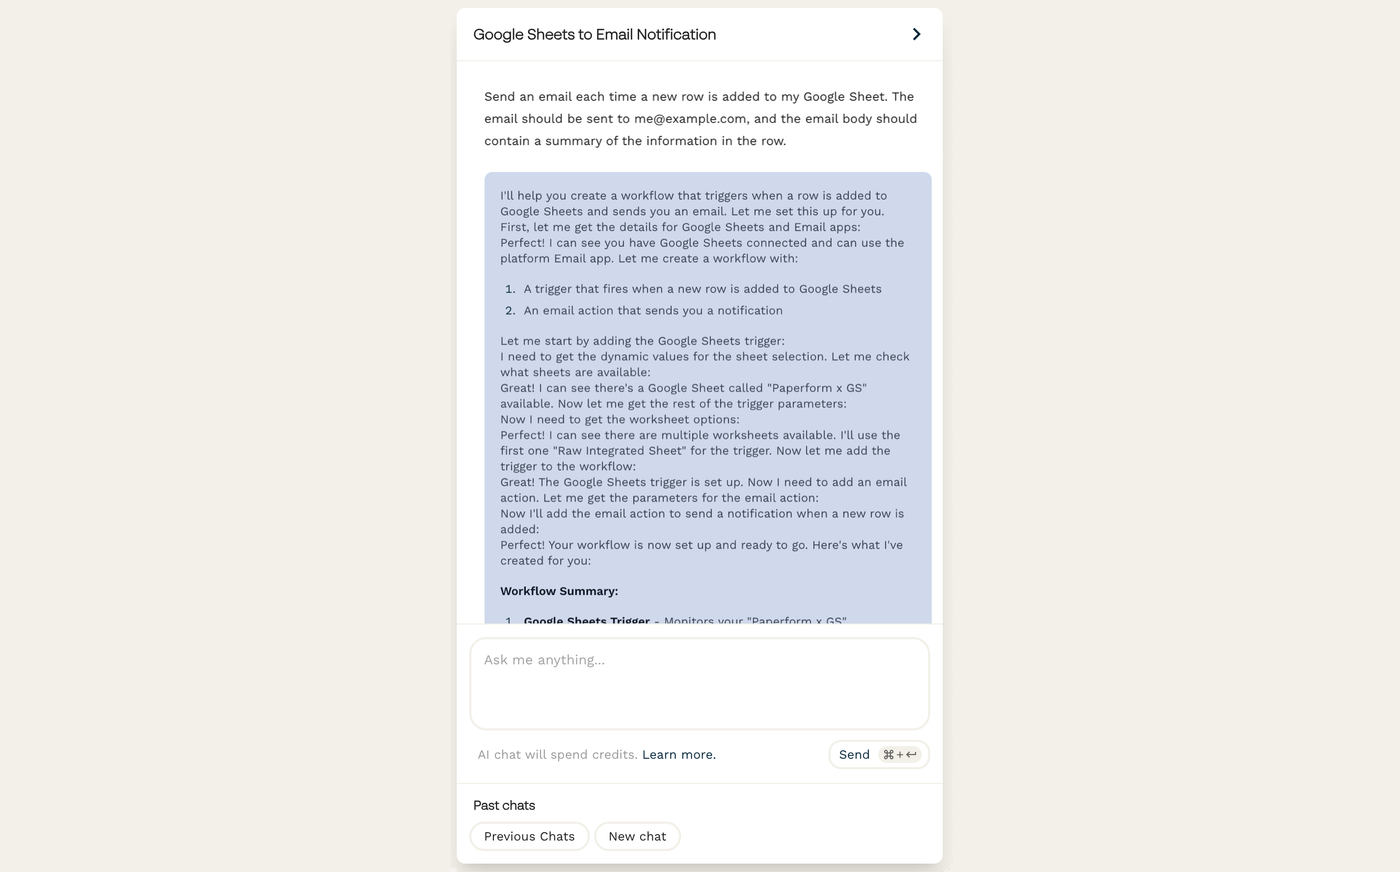
Once you give it the go-ahead, Stepper will begin to configure your workflow, narrating its progress in the conversation window. You will be prompted whenever a choice or action is needed. This could be authorizing a new app with your Stepper account, or making a selection, like which Google Sheet in your account should be monitored for new rows.
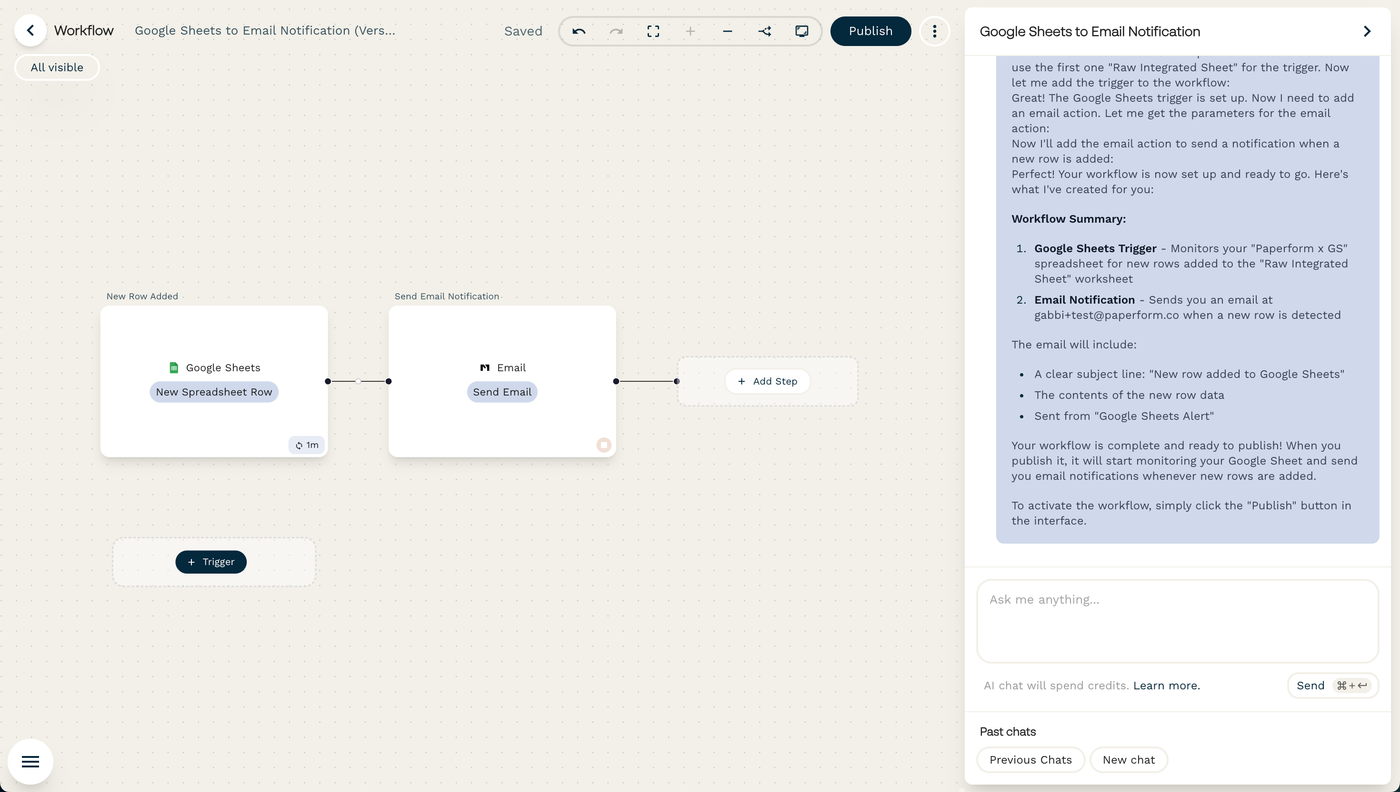
Once it's finished, Stepper will have added steps to the page in an attempt to complete the workflow according to the prompt.
Viewing the workflow steps
At this point, you may wish to peek under the hood and see what's been built so far. You can click on a trigger or action step to see its configuration.
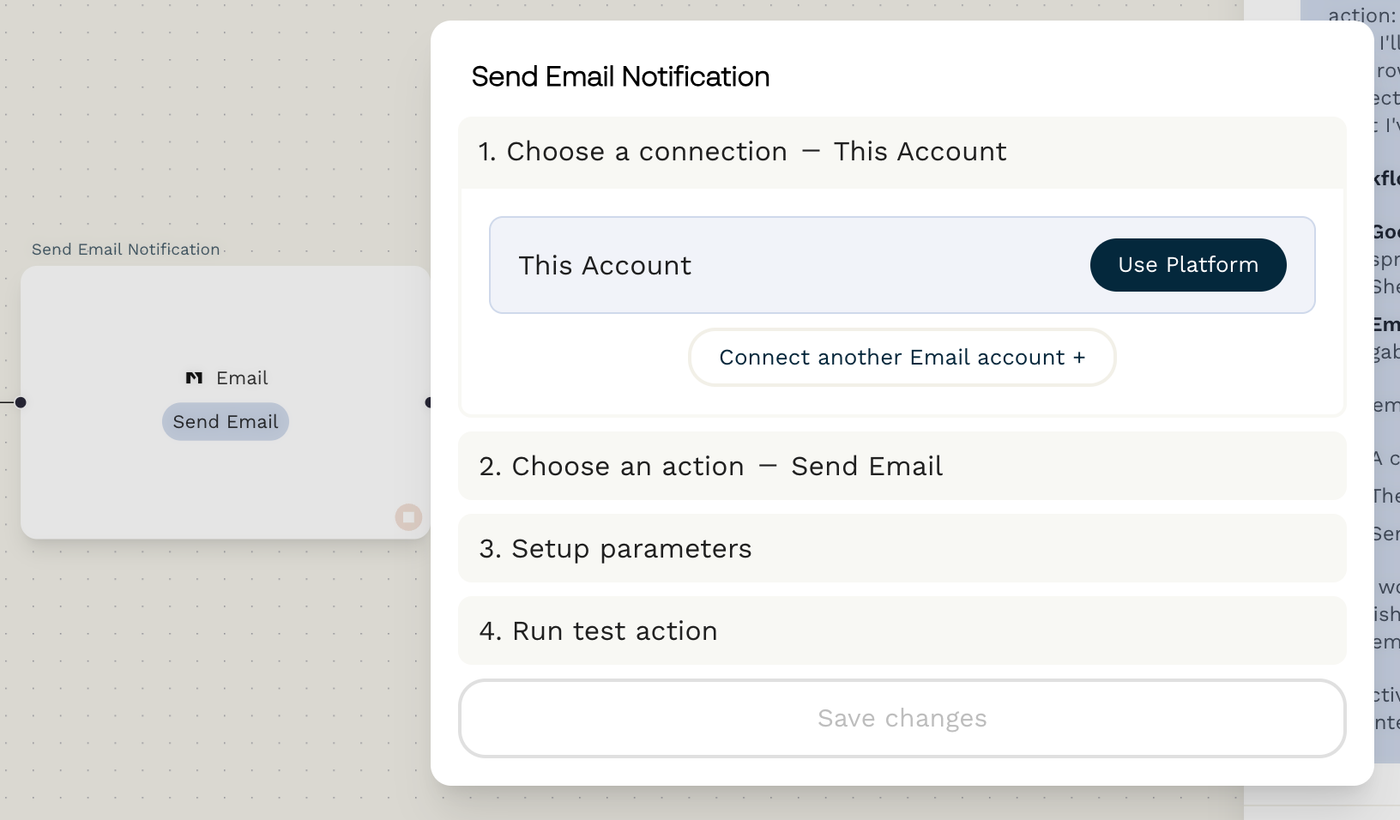
Each step is split up into four parts:
- Choose a connection: authorize an app to work with Stepper, or select a previously authorized connection.
- Choose a trigger/action: choose what the connected app is doing at this step.
- Set up parameters: configure the details of the action or trigger. In the case of sending an email, this is where you would indicate the recipient, subject, and email body. Type the `@` key to pipe in a value from a previous step.
- Choose an example/Run test action: For triggers, this allows you to select an example to use as the trigger when testing. For actions, you can run a test of that step.
Testing your workflow
Listen for a New Event
There may be times when you may need to test a specific scenario in Stepper. In these cases, the Listen for Event feature can help by capturing live webhook data from your trigger.
To start listening for a real webhook event, click on your trigger step and then select the ear icon.

Once Stepper is listening, perform the action that triggers your workflow. For example, if you're using a Paperform trigger, submit the connected form.
When the trigger event is received, Stepper will automatically populate the example data with the information from that specific event. You can then use this data to test and validate the exact scenario you're working on.
Making changes
Using the AI
Let’s say that our test email came through successfully, but we didn’t end up liking the format as much when we saw it in the context of a real message. We can prompt the AI to make changes to our specifications. For example:
"Change the email body so that it contains all of the same information, but it’s written as a paragraph summary with a conversational tone, rather than a list of bullet points."
After the AI makes it’s updates, we can click into our action and select "3. Setup parameters" to see how the body of the email has changed.
Editing manually
Perhaps we’re still not totally satisfied with the tone of the email, so we decide to edit this step directly from and write the email using our own words. We’ll go ahead and redo the email ourselves within that "3. Setup parameters" menu.
When entering content, you can use a combination of plain text and piped values from previous steps. To find a dynamic value, just type the @symbol followed by whatever input you need. We have a "Name" column in our spreadsheet, so we can type @name to find the matching value from our new spreadsheet row and pipe it directly into our email body.
Spotting Issues
Sometimes, the AI will recognize a potential problem with your setup. When this happens, there will be a button to view "issues" in the top-right corner of the screen.

From here, you can click "Fix Warnings" or "Fix with AI" to tell Stepper to try to diagnose and fix the problem on its own. You can also click "Explain issues" for an AI summary of what's wrong, or click "Go to issue" to take you to the problem if you would like to fix it by editing the workflow manually.
Publish & Run
Full Test
Now that everything is working as expected and your run is published, one last test is always recommended: the one from the customer's perspective. Go ahead and complete the trigger action that your run is listening for, to make sure that it feels intuitive and everything else falls into place as expected.
In our case, we'll enter a new spreadsheet row in our Google Sheet, and then wait for our email to arrive.
The Stepper Dashboard
Finding your way around
Now that you've completed and tested our first run, let's look at the other options available in the Stepper Dashboard.
Workflows
This page shows all of your live and paused workflows, as well as unpublished drafts in progress. You can click on "Runs" next to any workflow to visit the Run Dashboard, or click "Edit" to make changes or toggle from live to paused.
Component Libraries
You can think of components as reusable sections of workflows. By saving a component, you can add the same set of steps into other workflows with ease.
Connections
This page gives an overview of all of the other apps that you have currently authorized to use with your Stepper account. If you're having any issues with a specific app connection, you can check its status on this page or try reconnecting it.
You'll also see the option to view the Workflows and Components that involve each connection. New connections can also be set up from this page if you'd like to have something ready to go for future workflows.
Webhooks
In addition to directly authorizing apps for use with Stepper, you can also set up a custom webhook as a trigger for your workflows.
Webhooks are a more direct and technical option that will be familiar for developers. If you have the technical knowledge, you can use the Webhooks page to generate a URL which can receive a payload as the first step of a workflow in Stepper.
Credits
Credits are like tokens you can spend in Stepper on features that incur extra costs — such as AI steps, sending emails or SMS, and using premium APIs.
Creating a workflow and running a workflow may use up credits, depending on which features you use. If you use up all your credits, any workflows that depend on credits will automatically pause.
Next steps
Doing more with AI
Congrats! Your first workflow is up and running, and you’re familiar with the Stepper Dashboard. From here, you can feel free to get creative with prompts and come up with new ideas for how to use the product. You could try asking the AI to:
- Set up longer workflows with multiple actions. Perhaps your trigger is a form submission inquiring about a specific product. For the first action, you could look up the relevant product in a spreadsheet, then find the current price in the same row. Next, an email response is sent to the submitter containing with the up-to-date pricing info.
- Add additional triggers to the same workflow. For example, perhaps you want a series of events to happen when someone contacts your support team. Stepper could listen for new emails arriving in the support team’s inbox, a new submission of your contact form, or a new message in your website’s live chat widget; with any one of these events kicking off the same workflow in response.
- Use branching and conditional logic to perform different tasks under different circumstances.
Doing more manually
There are many more manual options in the Stepper editor too. Hover over the white dot along the black line connecting any two steps, and you’ll to see some options:
- Conditions: add some logic to make the current step conditional. It will only move on to the following step(s) if certain condition(s) are met.
- Insert step: add a new action between the two connected steps.
- Split and add step: create a second pathway for an alternative or concurrent step. You may wish to add conditions to each path, so that one or the other is followed depending on events in the previous step(s).
- Move branch: take the selected pathway and move it to a different moment in the workflow.
- Copy branch: duplicate the selected pathway and select where in the workflow to add the copy.
- Delete branch: remove the selected pathway and action(s).
Example: Adding a condition manually
Using our example from earlier, let’s try adding a condition between our two steps. We’ve noticed that new spreadsheet rows sometimes trigger a new email before we’re ready, and sometimes we might want to deliberately hold off on the email until a later time.
So, we decided to add a new column labeled “Ready to send?” in our spreadsheet. We only want to allow the email action to run after a value has been added to this cell.
First, we select “Conditions” from the white dot between our trigger and action.
We could prompt AI for the condition directly, but let’s set it up manually in this case. We’ll manually add condition if there isn’t one already, and then select the “Ready to send?” column from the first field.
For the operator, we’ll use “Is Not Empty.”
And that’s it! We can click “Save” to use the condition. The email will not fire while the “Ready to send?” column is empty.
Get creative!
From here, you're ready to explore all of the possibilities of Stepper for your automation needs. If you have any questions or need inspiration, reach out to our support team.