The tech-stack: the well-loved leather toolbelt of the online worker. As your digital business grows, so too does this collection of apps and services.
An email marketing tool for automatic messages here. A CRM for collecting customer data there. After a little while, your toolbelt might start looking less like a pocketful of gadgets and more like an overstocked aisle at Home Depot.
When that starts happening, it’s important to find a way to keep all your apps connected. That’s where third-party integrations come in.
What are third-party integrations?
Third-party integrations allow you to connect apps that otherwise wouldn’t be able to communicate. With these connections in place, your tools can share data across platforms, trigger actions across apps, and help you automate more of your everyday processes.
Let’s say you’re a freelance graphic designer, and you offer clients a free 15 minute video consultation on your website. You might use a tool like Calendly to schedule these meetings, a form builder like Paperform to create the scheduling form, and Gmail to send out confirmation messages.
With a third-party integration, you can set the entire process on autopilot. Connect your Paperform to Calendly to have your calendar updated automatically. Then, connect Paperform to Gmail to have confirmation emails sent to both parties.
What’s the difference between third-party integrations and native integrations?
There are two main types of integrations in the tech world: third-party integrations and native or direct ones.
- Native integrations are able to connect directly via their APIs (application programming interface) with no assistance from an additional party.
- Third-party integrations use an additional software platform to create an API integration between two apps.
Let’s break that down in layman’s terms. Imagine two people having a conversation over the phone. If both of these people speak the same language, all they need is the phone in order to chat.
A native integration is like that phone. It connects two apps directly, without any third-party service required.
But what if one person speaks French and the other Mandarin? They’re going to need more than a phone to understand each. They’re going to need a translator.
In this example, a third-party integration would be that translator. It connects the two tools using an additional tool: an integration platform like Zapier or Make.
Which tools can help connect third-party integrations?
There are several platforms you can use to create third-party integrations, each with its unique benefits and pricing plans. Zapier and Make are the most popular, but there are plenty of under-the-radar alternatives to choose from, too.
1. Zapier
Zapier is one of the original third-party integration platforms. It uses a beginner friendly drag and drop interface to set up “zaps” or connections between tools.
Every zap is composed of two parts: the trigger and the action. To set one up, all you have to do is select your two aps. Then, pick a trigger in one (what will cause the result) and an action (the result) in the other.
This might be sending an email in Gmail every time someone submits your purchase order form, or adding a task in Asana when someone reaches out to your customer service team via Slack.
Zapier also offers templates of popular zaps, so you can start automating common processes even faster. It’s a great option for automation beginners, and those looking for a wide range of potential app connections.
Zapier offers a limited free plan that supports 100 tasks a month, with paid plans starting at $19.99 billed annually.
2. Make
Make (formerly Integromat) is another powerhouse in the integration world. It also uses a drag and drop builder to create app connections, which it calls “scenarios.”
Make has a highly visual interface, and uses graphical elements to illustrate the workflow you’re creating. The modules and functions empower you to create simple connections and more complex, multi-step workflows alike.
Make offers a more robust free plan than Zapier (1,000 operations a month) making it a great option for budget-minded folks looking to dip their toe into automation. Paid plans start at just $9 a month, and offer unlimited scenarios and up to 10,000 operations a month.
Make is great for visual learners looking and anyone with a slightly more technical background. The builder is a little more hands-on than Zapier’s. There are a ton of supported connections and templates to choose from, and a range of affordable pricing options.
Not sure whether Zapier or Make is right for you? Check out our in depth comparison guide to help you make the best choice for your business.
Alternatives to Zapier and Make
Just because they’re the biggest in the biz doesn’t mean Make and Zapier have a corner on the market. There are plenty of worthy alternatives out there for those looking for something a little different.
- N8n.io: this third-party integration platform is truly unlike all the rest. Thanks to the radical open-source platform, it’s entirely free to use at every level. You’ll need quite a bit of coding knowledge to create your app connections, but if you’re willing to do the dirty work, you can set up as many integrations as you like without spending a dime.
- Workato: on the opposite end of the spectrum, Workato is a great option for those looking for an enterprise solution. This third-party integration platform is designed with large businesses in mind. You can create as many complex, conditional “recipes” for automations as you like, or try your hand at making an AI powered chatbot. Pricing is steep (and available via direct quote) but if you’re looking for a large-scale, customisable option, this is a good bet.
- Hubspot’s operations hub: this platform is great for Hubspot users looking for an integration tool that works seamlessly with their favourite CRM. It offers the unique ability to create automations that work in two directions (known as bi-drectional sync). Paid plans start at $40 a month.
Benefits of third-party integrations
Third-party integrations (sometimes called third-party APIs) are designed to make your life easier. They offer loads of benefits, from saving time to reducing errors.
- Saving time: busywork is the enemy of focus. Those tiny repetitive tasks might not seem so bad on their own, but they can snowball into a blizzard before you know it. Soon, you’re spending your mornings manually adjusting cells in a spreadsheet, and wondering why you’re so burnt out by noon. With a few well placed integrations, you can eliminate hours of this kind of busywork each day.
- Reduce errors: in the wise words of teen pop sensation Hannah Montana, nobody’s perfect. Human beings make mistakes. It’s part of what makes us so lovable, but it’s not ideal when it comes to completing the same menial tasks, day in and day out. Third-party integrations allow you to set up automations that work perfectly, every time—without the risk of human error.
- Improved quality of life: nobody likes spending their days bogged down by mindless tasks. When you automate more of your everyday processes with integrations, you free up your mind to focus on the stuff that really matters. That might mean brainstorming ways to expand your business, or giving your pup an extra round of fetch at lunch. Whatever it is, your quality of life will improve when you let your techstack handle more of the processes you dread.
- More automation potential: third-party integrations offer a much wider range of automation potential than direct integrations do. Thanks to platforms like Zapier and Make, you can connect apps that wouldn’t be able to integrate directly, giving you way more opportunities for automation.
How to implement third-party integrations with Paperform
Setting up a third-party integration in Paperform is easy. To get started, log into your Paperform account and open the form you’d like to integrate. If you haven’t collected any responses in this form, click the eye icon to submit a sample answer. This will come in handy later.
Once you have at least one response, click on the After Submission tab from the editor. Navigate to Integrations & Webhooks to find the automation you’re looking for.
Scroll past the direct integrations and webhooks sections and select your integration platform of choice: either Zapier or Make.
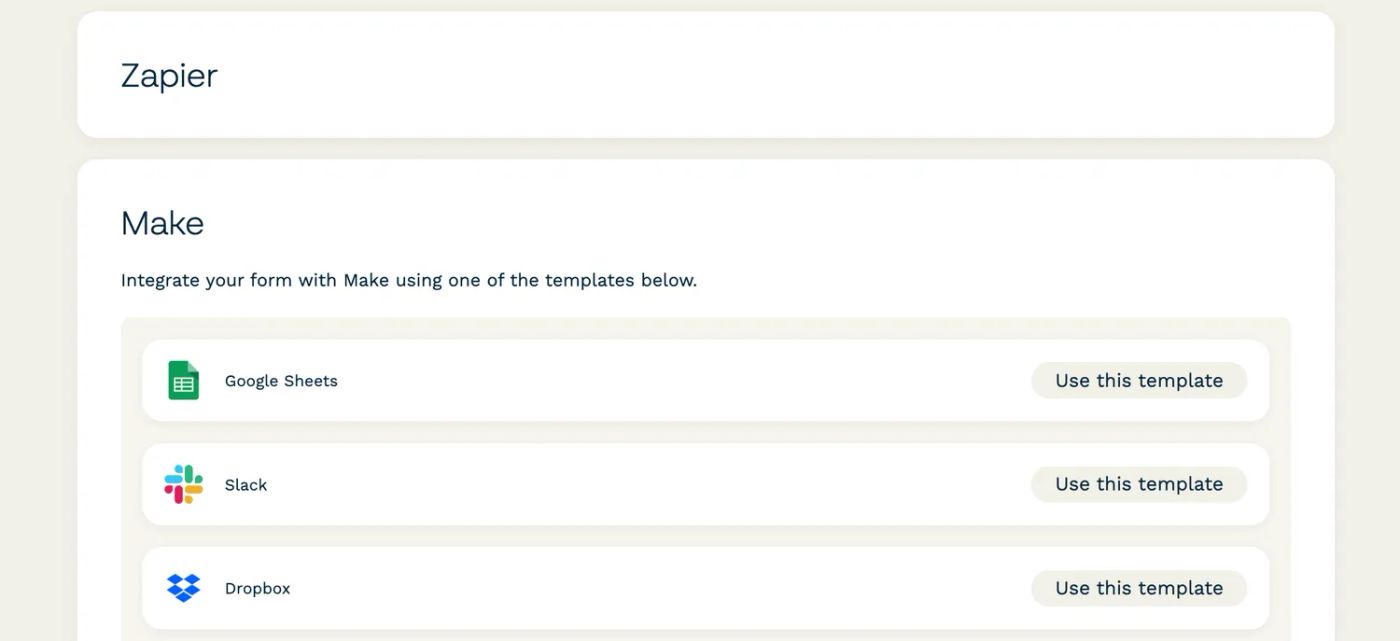 (Source: Paperform)
Paperform supports over 3,000 integrations through Make and Zapier, so if you're looking to connect to one of your existing business tools, chances are it’s available.
For this tutorial, we’ll connect our Paperform with Airtable using Zapier. Click Use this Zap to get started.
Log in to Zapier and authorise Paperform when prompted. Before finalising your zap, Zapier will need to test the connection using your most recent Paperform submission. Remember when you filled out that sample response earlier? That’ll come in handy now.
Click Test trigger in Zapier to check the connection. If it works, you’ll be prompted to log into your Airtable account to set up the Zap. Allow all authorizations and choose which Airtable project and table you’d like to connect.
 (Source: Zapier)
Select your desired action and trigger from the options provided. Zapier uses data from both Paperform and Airtable to display options specific to your form and table, so you can be extra specific about exactly what data will be shared and where.
When you’re happy with your set-up, click Test action to try out the connection for the first time. Before you finalise your zap, head to your Airtable account to double check that everything is populating correctly.
 (Source: Zapier)
If everything is looking good, click Publish to set your zap live. And that’s it! Now everytime someone submits your Paperform, the relevant answers will be stored neatly in Airtable. No further work required.
Must-try Paperform third-party integrations
With so many third-party integrations to choose from, you’re bound to find an automation that works for you.
Still, we don’t want to leave you in decision paralysis. That’s why we’ve compiled 10 of our all-time favourite Paperform third-party integrations you can set up in minutes.
1. Gmail
This connection is a must-have for any business that runs on email, which is virtually every business.
Once set up, you can send customised automatic replies every time someone submits your Paperform. It’s great for sending a quick acknowledgement after a support request, or thanking a customer after a recent purchase.
2. Salesforce
Salesforce is a highly versatile CRM perfect for e-commerce businesses. When you connect it with Paperform, you can automatically add leads and update customer information with every form submission.
This is a perfect connection for anyone using Paperform to build contact forms or lead generation surveys. Collect the data once, and share it with all your relevant platforms automatically.
3. Google Calendar
Managing a busy schedule is a hassle. This integration makes it easier. By connecting your Paperform with Google Calendar, you can create a branded, beautiful scheduling form that automatically updates your Google Calendar with every submission.
No more endless follow up emails or scheduling meetings. Just send over your booking form, and let your tools do the work for you.
4. Shopify
This integration is essential for anyone selling with Shopify. When you connect your Paperform order form with Shopify, you can automatically update your inventory when someone makes a purchase.
You can also use this integration to create orders, customers, products, or even blog posts with every form submission.
5. Zoom
Once set up, this connection can automatically add webinar attendants in Zoom when they sign up using your Paperform.
6. Trello
Todoist is a powerful, intuitive task tracker, perfect for businesses and individuals alike. When you connect it with Paperform, you can add tasks to your lists with every form submission.
Level up workflows with third-party integrations
We’ve only scratched the surface of what’s possible with Paperform’s third-party integrations. From managing your schedule to processing payments and communicating with your team, the automation potential is truly limitless.
At Paperform, we believe that you don’t need to be a tech whiz to save time with third-party integrations. We think everybody deserves to save time with automation. See what we mean with a free Paperform account today, and discover what you can create with Paperform’s third-party integrations.