Images form an important element of a customer's perception of your brand and products. The right shot not only makes a product stand out, it displays a sense of quality and gives potential customers the push they need to hit that buy button.
70% of online shoppers rely on product photos when deciding on a potential purchase. If a picture is worth a thousand words, then fantastic product photos are worth a thousand purchases—whether you're selling digital ebooks or building an online fashion retailer from scratch.
There's just one problem: most small businesses and startups don't have the budget to hire a professional photographer, let alone invest in expensive studios and equipment. That's why we put together this guide on DIY product photography ideas you can use to glow up your ecommerce store without breaking the bank.
What is Product Photography?
Product photography involves taking still-life pictures of your products for commercial use. These photos are used in catalogues, brochures and marketing materials—and importantly for ecommerce sites—the product pages of your company website.
The main goal of product photography is to make product look attractive as possible. Like choosing a flattering photo for your online dating profile—except instead of trying to get someone to ask you out, you're trying to get a customer to make a purchase.
Why is good product photography important?
It's hard to imagine buying any product without seeing what it looks like. And if you can't walk into a shop in person, product photography is the next best thing. That's why ecommerce stores rely heavily on product photograph to sell goods. Taking the time to take great product pictures is an essential part of any ecommerce workflow.
According to MGA Advertising, 67% of online shoppers believe that high quality images are essential to the ecommerce experience. In fact, somewhat surprisingly, customers value the quality of a product's image over product-specific information, descriptions and even ratings and reviews.
But what is "good" product photography? Is it enough to place a product on a table with a white background and snap away? While it largely depends on the product, you should try where possible to make your photos as engaging as possible.
Fashion websites are great at this. Clothes don't look great on hangers—but they do look fantastic on models. Take a look at this example from an ecommerce store built with Paperform. It has product images that show how the sweatshirt looks on the body, while also making the design eye-catching and memorable.
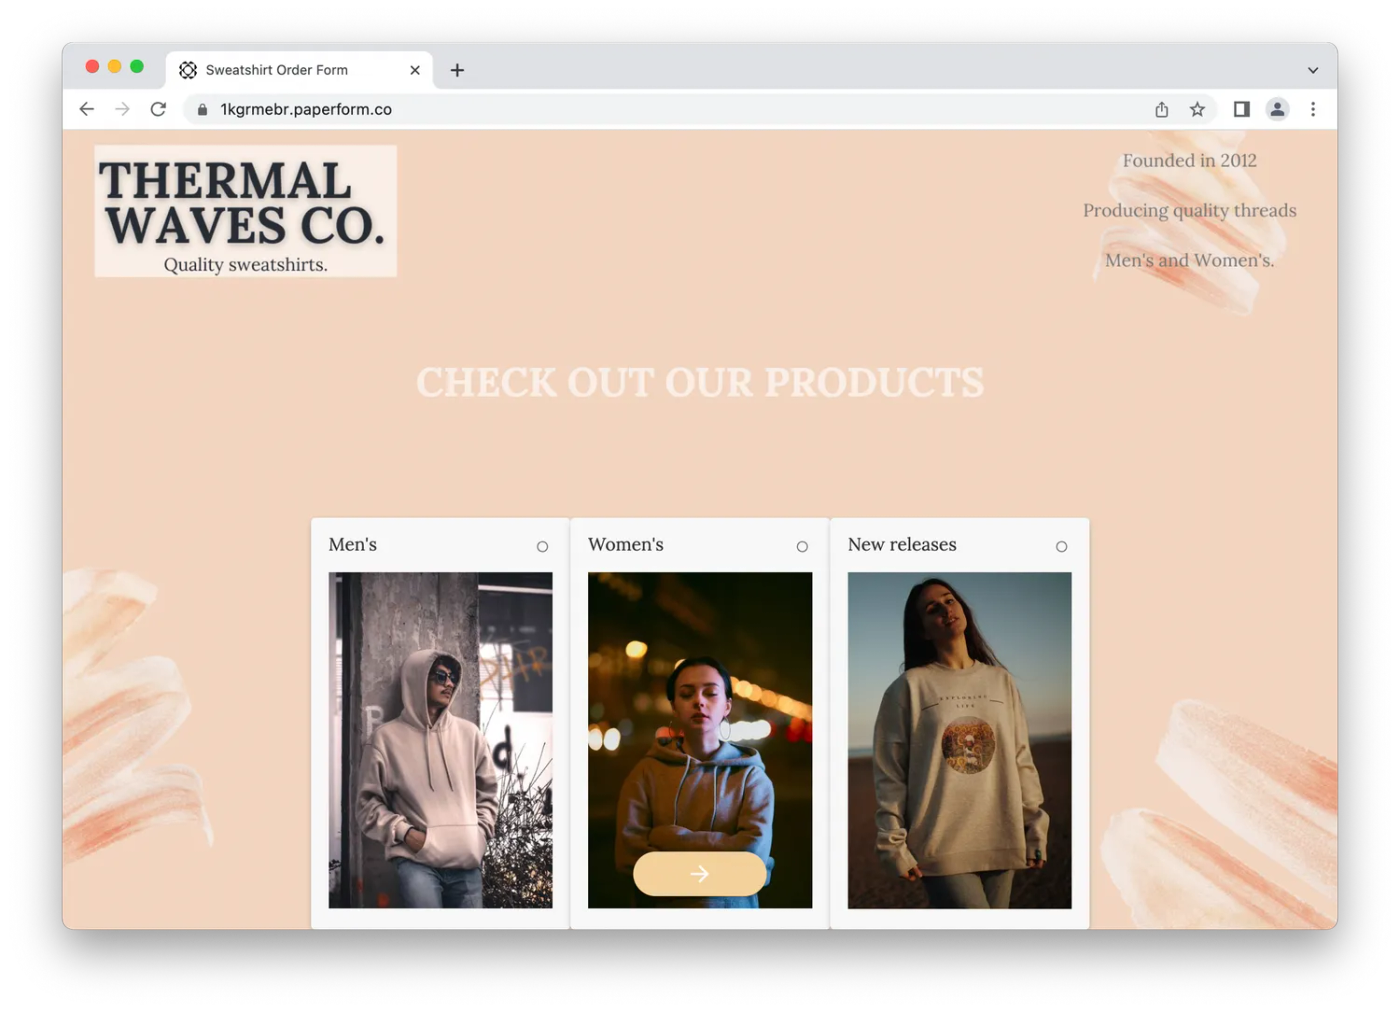 (Image Source: Paperform)
What do I need for product photography?
As important as an eye for creativity is, it's not the only tool you need. Having the right equipment can greatly impact the success of a product shoot. When determining your equipment, you should already have a clear picture in your mind as to what the finished products will look like.
You need to think about the props, backgrounds and devices you’ll need to make your vision happen. Below is some basic photography equipment used by professionals that you can easily add to your own repertoire:
- A camera
- A tripod
- A white background
- Lighting equipment
- Reflectors
- Sticky tape
The specs of your shooting equipment or camera will depend on your needs. Some small business owners are keen to invest in photoshoot equipment, but if you're cost-conscious, you can get by with a smartphone and a bit of DIY brainpower.
💡 Tip: Having reliable graphic design tools also help enhance your finished product. You can invest in a paid option like Photoshop or Lightroom, but there are plenty of free alternatives to help you get by.
How do you take creative pictures of products?
You don't have to be the next Andy Warhol to take great photos. Here are a few tips to help you:
- Shoot from odd angles. Usually when we think about taking photos we imagine nice square angles and products framed in the centre of a shot. Shooting from different angles can making products look a bit more interesting.
- Take multiple shots. No one gets it right on the first try. Take lots of photos—it's the beauty of digital photography, there's no limit to how many photos you can take. Better to have a vast library to choose from than be stuck with only a few.
- Try macro shots. Macro shots are shots that get very close to show intricate details. While these should be used in conjunction with normal product photos, these types of close-ups can make for eye-catching additions to your product photo lineup.
- Experiment with styling. Try using different accessories, props and backgrounds that tie in with the them or broader idea of the product. This can have a cool visual effect and build more of an atmosphere around your products.
- Get inspired by other creators. Whether it's an Instagram photo, a recent movie you saw or an album cover, take inspiration from designs you personally enjoy. It could be a background, a kind of photography lighting or an interesting use of colour.
12 product photography ideas to increase sales without breaking the bank
Having the right equipment certainly helps put your photoshoot together, but it's how you use them that makes all the difference. We've put together this tutorial of product photography ideas you can use for your own online store.
Most of these tips are simple hacks to get the most out of your photos. You don't need the most expensive equipment and professional gear to get results.
[NEWSLETTER]
1. Use a white card for a photo studio effect.
White is the most common backdrop for product photography for a reason. It provides a clean background that doesn't distract from your product. It's most often used for small products, so if you sell something like jewellery or shoes, white is the way to go.
How do you create a perfect white background? The easiest way is to buy a roll of white paper from a local arts and crafts store. It's cheap and simple to handle. Plus, with a large sheet you can easily create an infinity curve for greater effect.
A white card is also useful for proper lighting. The card reflects light onto your product and background, making sure the image looks great when displayed online. Proper lighting is a core principle of any kind of photography, and it can help elevate your ecommerce shots.
If you need an instant tool that helps remove distracting backgrounds from your photos, blur them, or change them to solid colors like plain white to further align with your brand, a background remover is a way to go.
💡 Tip: White backdrops are a prerequisite of Amazon and are strongly recommended by Google Shopping ads, Shopify, Paperform and other ecommerce platforms. A plain background is the best way to display the details of your product in a clear way.
2. Create a vivid scene to connect with customers
No matter whether you're selling yoga clothes or baked goods, you're selling a certain lifestyle. When potential customers see your product, they form ideas and options about it instantly. By creating a scene, you can influence the associations they create.
Let's say you're promoting a new brand of beer. You're not just selling a drink, you're selling all the things that come along with it—late nights, conversations with friends, parties, good times. Consider setting up a scene that reflects the idea behind your product.
 (Image Source: Elevate)
The above photo is excellent because it shows off the environment that beer is meant to be enjoyed in—by the pool, over a good chat with a close mate. Customers can see themselves in these kind of lifestyle shots much more than they can with a picture of a beer against a plain background.
Of course, these types of shots take a bit more effort to set up. But it doesn't have to be a full production. Invite a few friends to a location and snap some shots. You'll be surprised with what you can produce.
3. Build 360 product photos with a Lazy Susan
360-degree photos are becoming a trend for ecommerce stores. They allow customers to rotate an image and see the product from every angle, making them useful for items like furniture and home goods.
To get the shots necessary to achieve this effect, professional product photographers use a special turntable. But you can get the same thing done with a rotating tray, otherwise known as a Lazy Susan, available for ~$10 from any homewares store.
Simply place your white card on top of the Lazy Susan. Start by taking a picture of the item while it's facing forward and rotate it slowly to get the other shots you need. You can then combine them together and upload them to your ecommerce platform.
4. Add depth (and elegance) with a glass surface
A tabletop or any flat surface is the bread and butter for any DIY product shoots. You can take it one step further with a piece of glass—reflective surface like glass can add a tad more creativity and class to your otherwise plain product shot.
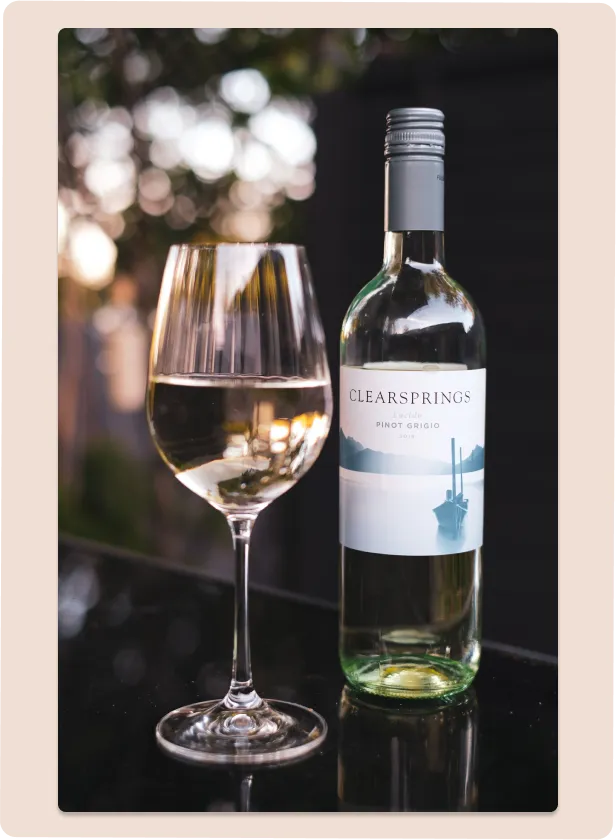 (Image Source: Bryony Elena)
The glass creates a reflection that adds more depth to your photo. It also makes certain products (a bottle of wine for example) look more elegant and expensive. For ecommerce stores after an upmarket look on a budget, this can be an effective strategy.
5. Enhance your lighting with a table and curtain
A light box is a useful photography item for shooting smaller items. You can make one in a few minutes with a table and a translucent curtain or sheet. Simple turn your table upside down and drape your curtain over it to create the desired effect.
The curtain acts as a diffuser and generates a soft and even lighting effect. If you don't have lighting equipment, you can place your new makeshift light box beside a natural light source.
💡 Tip: Feeling adventurous? You can also create shadow effects by playing around with patterns.
6. Keep it natural with outdoor photography.
Outdoor photography is probably the most affordable photo idea on this list. All you need is your camera—mother nature looks after the rest. On the right day, the outdoors can give perfect natural lighting and provide brilliant backdrops for health, lifestyle and beauty products in particular.
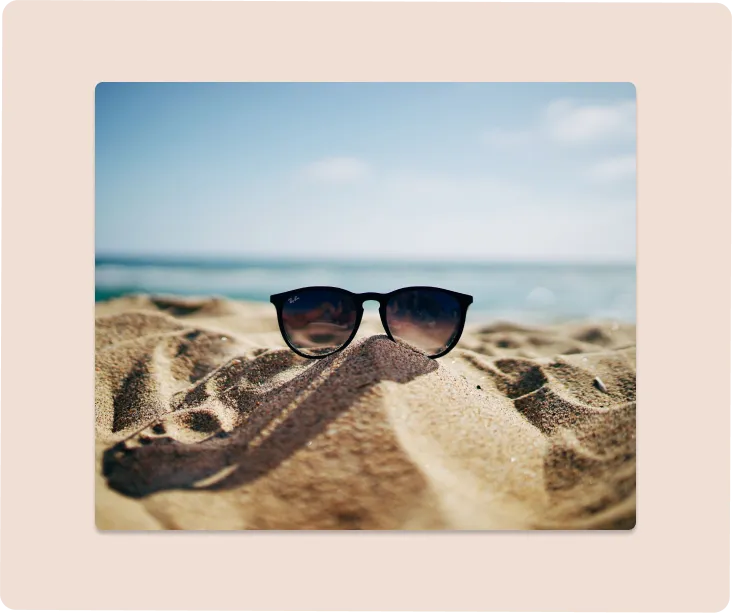 (Image Source: Ethan Robertson)
All you've got to do is choose the perfect background for your brand. Try to find a match between your products and setting. For example, if you're selling swimwear naturally you would choose a beach, while a brand selling hiking gear might choose a mountain or forest setting.
7. Make products float with a fishing line.
Looking for unique ways to make your products pop? Well, you don't have to be a Photoshop magician (or a real one). With a simple fishing line, you can set up an effective shot that makes it seem like your product is suspended in thin air.
Just attach a fishing line to the product and attach it to a base overhead—the transparent line will barely show up in the final image. While you can do this on a plain background (which is better for editing out the fishing line later) you can do it with natural surroundings, and even models, as well.
 (Image Source: Felipe Pelaquim)
Fishing line has been pivotal for making things look like they're flying since old Sci-Fi movies in the 1920s. It's a classic DIY trick and works a treat. Just remember to edit it out with your photo editing software of choice (simply "paint" over the line).
💡 Tip: Dynamic images like this are particularly useful for sharing images on Instagram and other social media. According to Facebook, 83% of Instagram users say the platform helps them discover new products and services, and active images like this help draw potential customers to click on your photos.
8. Create a reflector with tin foil
If you’re shooting your products with only one source of light, it can create harsh shadows that affect the quality of the image. Reflectors prevent this from happening by allowing light to bounce back and, therefore, dampen any shadows.
For an easy (and cheap) alternative you can make your own reflector with material around the house. All you need is a piece of cardboard, some aluminium foil and something for the cardboard to rest on. Wrap the foil around the piece of cardboard, prop it up—and you've got yourself your very own DIY reflector ready to go.
9. Use a cheap marble backdrop for a fresh look
Marble backdrops have become increasingly popular in the last few years, especially for food photography, where it gives a sense that the photo was taken on a (premium) kitchen countertop or restaurant table.
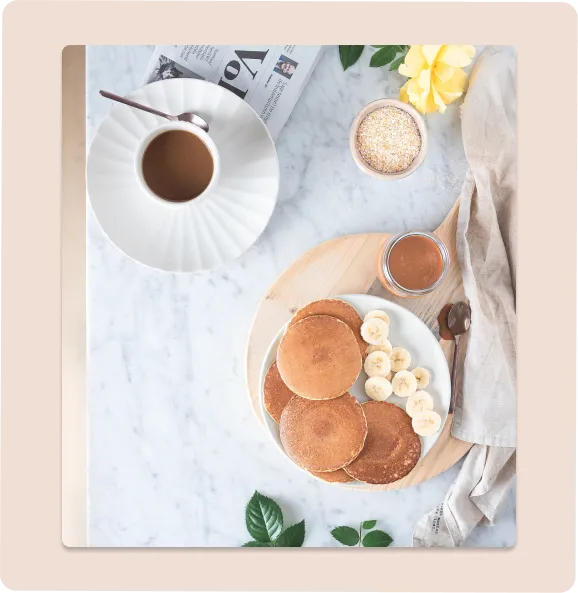 (Image Source: Visual Stories || Micheile)
You can buy cheap marble vinyl sheets online, or if you're after a more tactile, custom look, you can always make your own with some paint. To do so, mix two contrasting colours and drip them onto a piece of cardboard.
Of course, if you're more digitally inclined, with a white background you can always add any pattern you want in your favourite graphic design tool.
10. Use window lighting to add a dramatic effect.
As we mentioned earlier, natural light is a fantastic source of lighting. Best of all it's free, and you don't need to spend hours manoeuvring light fixtures and lamps to take advantage of it. If you're looking to add some drama to a product shot without Photoshop, consider placing your products by a window.
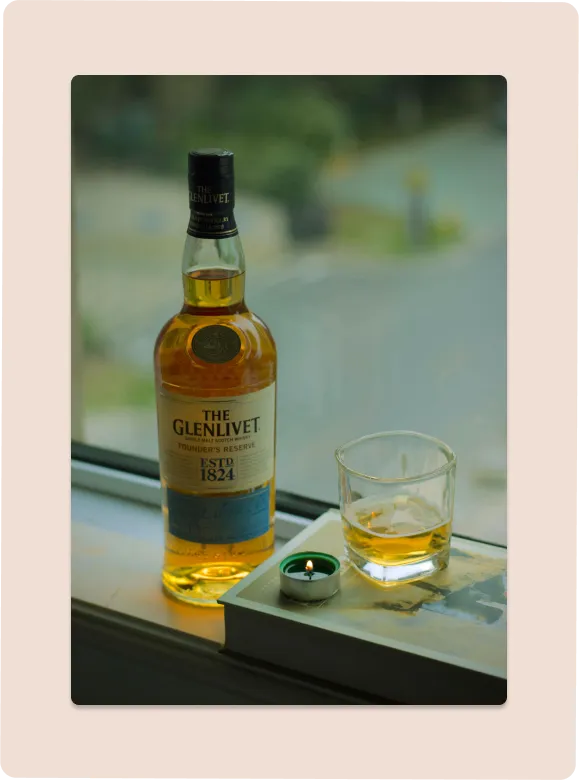 (Image Source: 戸山 神奈)
The effect you get depends on the time of day. During the evening you'll get lovely warm light, while earlier in the morning you'll get cooler tones.
For a cleaner look, you can place a white background near the window, or a reflector beside it. If you can find a frosted window, you can also get a textured, softer light that looks fantastic.
11. Add a lens flare for extra style
Traditionally, photographers avoid lens flares as they occur as a result of unexpected light reflections or lens impurities. They're an impurity. But there can be beauty in imperfection, and in recent years they're back in vogue (check out a J.J. Abrams film to see what we mean).
Lens flare can make your product shots more dynamic, eye-catching and stylish when done right. This is particularly applicable for luxury items like watches, jewelry, cars and skincare items.
Now this is also something you can do with design tools like Canva, but for more of a natural look, you can use a CD. If you're using a DSLR camera you'll have to remove the lens hood as it's specifically designed to prevent lens flare.
You can then place the bottom part of the CD near the eye level of the camera so that it reflects light and creates flares. Play with the different angles to get new and interesting effects and intensities.
[CTA]
12. Make fake water droplets for frosty beverages
Trying to sell beverages and wondering how those geniuses at Coca-Cola always make their drinks look so refreshing? The secret is using glycerin and water for the perfect water droplet effect. Add these two elements together, put them in a spray bottle and spray the concoction over your product for a nice chilled effect.
 (Image Source: Gyula Zsámbok)
Why glycerin? Well, you could just use water but the glycerin prevents the water from running down the product or evaporating instantly. This means you don't have to rush to beat the clock, giving you more time to set up your perfect shots.
Time to get snapping
Product pictures are a customer’s way to examine your product online. They can either encourage site visitors to make a purchase, or abandon their shopping carts altogether. This is why creative product photography is a must for ecommerce stores, big or small.
With Paperform, you can build your product site, upload product photos, and edit them—all from one easy to use, powerful editor. Our built in image editor lets you adjust size, exposure, brightness, annotate on images, and more. But don't take our word for it— give it a go yourself with our 7 day free trial, and start sharing your product photos today.
This post was written by a guest author named Mark Condon.