
Last updated July 2026
Paperform's WordPress plugin lets you add a fully designed contact form to your site in a handful of steps, without touching code. Every website needs a way for visitors to get in touch, and WordPress, the platform behind a huge share of the sites on the internet, doesn't include a form builder out of the box. This guide walks through exactly how to add one using Paperform, plus what else to know about spam protection, popups, and testing your form once it's live.
TL;DR
| Question | Answer |
|---|---|
| Does WordPress have a built-in contact form? | No. You need a plugin or an embedded form from an external builder |
| How long does it take with Paperform? | About 5 minutes once the plugin is installed |
| Do I need to know code? | No. Paperform's editor and the WordPress block/shortcode are both no-code |
| Can it accept payments? | Yes, through Stripe, PayPal, Square, and Braintree |
| What if I want a plugin comparison instead? | See our full guide to WordPress form builder plugins, linked below |
Why you need a contact form
Contact forms let people get in touch with you, whether you're running a growing business or a solo portfolio site. The alternative, an email address slapped onto your site somewhere, causes more problems than it solves:
- It looks unprofessional. A simple contact form looks more polished than an email address linked in your footer.
- It's not secure. A visible email address is an open invitation to spam bots, and it tends to end up on junk mail lists fast.
- It's unintuitive. Visitors have to copy your address and paste it into their own email client, adding an extra step and a chance to lose the person entirely.
- It's limited. With just an email address, you lose access to the things a proper contact form offers: integrations, organised submissions, and spam protection.
A contact form avoids all of this. It's a more effective, more professional way for people to reach you, because it:
- Simplifies communication. Visitors fill in the fields, hit submit, and the message lands wherever you want it, whether that's an email notification or a message in a third-party tool.
- Looks more professional. A well-designed contact form signals that you take enquiries seriously.
- Organises your data. Custom fields let you categorise incoming messages and set up automated workflows to track communication.
- Protects against spam. A contact form doesn't expose your email address to scrapers, so you're not left fielding spam.
- Retains your privacy. You get more control over who contacts you and what kind of messages you receive.
- Offers advanced functionality. Paperform adds features like automated processes (say, adding new leads to a Mailchimp list), custom success pages, and payment collection through PayPal or Stripe.
A quick word on plugin options
There's no shortage of WordPress contact form plugins, and Paperform isn't trying to be a drop-in replacement for tools like WPForms, Gravity Forms, or Contact Form 7. If you want the full rundown of how those compare on pricing and features, our guide to the 6 best WordPress form builder plugins in 2026 covers six of the major options in detail.
What Paperform offers instead is a form built outside WordPress entirely, in a doc-style editor with the same design flexibility, conditional logic, and payment fields as Paperform's standard form builder, then connected to your site through a plugin, a Gutenberg block, or a shortcode. There's no separate "lite" version and no drag-and-drop builder bolted onto the WordPress backend. The rest of this guide walks through exactly how that works.
Create a contact form in WordPress in 6 steps
Using Paperform to add a contact form to WordPress takes about as long as your morning coffee. Here's the step-by-step process.
Step 1: Download Paperform's WordPress plugin
There are three ways to get the plugin:
- Direct download from Paperform's website
- Direct download from WordPress.org
- Installation from the WordPress Plugin Directory inside your dashboard
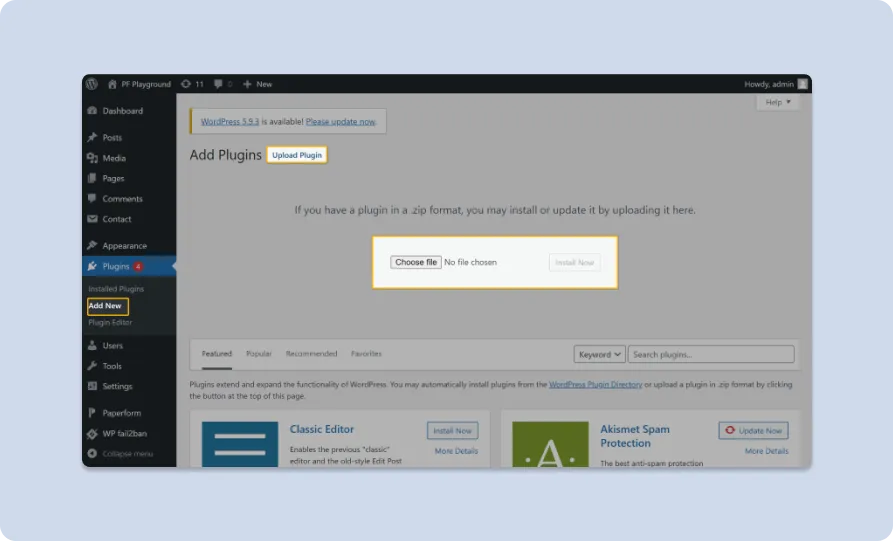
For direct download: download the .zip file, then go to "Plugins" in your WordPress dashboard. Select "Add New", then "Upload Plugin" at the top of the page, and install the .zip file.
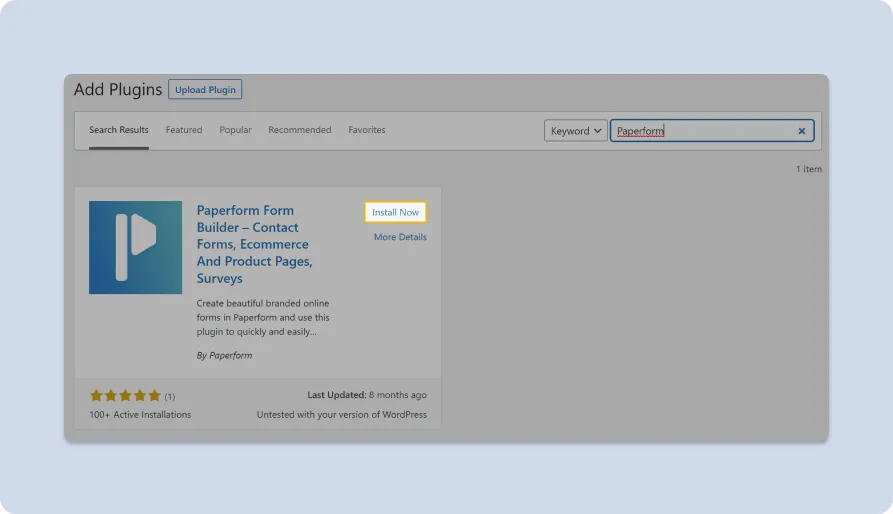
For installation: go to your WordPress dashboard, select "Plugins" then "Add New". Search "Paperform" and click "Install Now".
Step 2: Activate the plugin
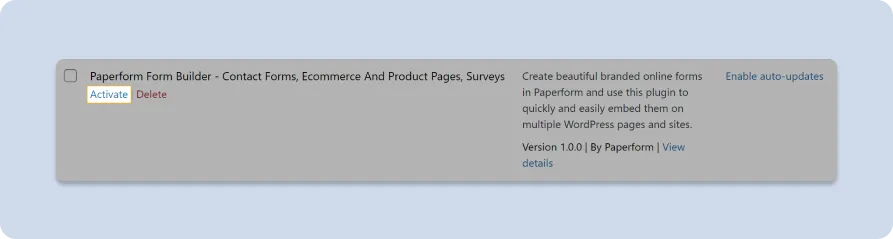
Whichever route you took, activating the plugin is the same process. Head to "Plugins" then "Installed Plugins" in the sidebar of your dashboard, where you'll see a list of your installed plugins.
Find Paperform Form Builder in the list, then click "Activate".
Tip: Some devices extract .zip files automatically. Make sure you're uploading the original .zip file, since the upload won't work with an already-extracted folder.
Step 3: Build your WordPress contact form
With the plugin activated, all that's left is building the form itself. Unlike plugins that shoehorn form creation into the WordPress backend, Paperform lets you build the form in the regular Paperform editor.
If you're an existing subscriber, you already know the drill. New customers should head to the Paperform Dashboard and select "Create Form". You'll be asked whether to start from scratch or use a template. For a simple contact form, a template is the faster route.
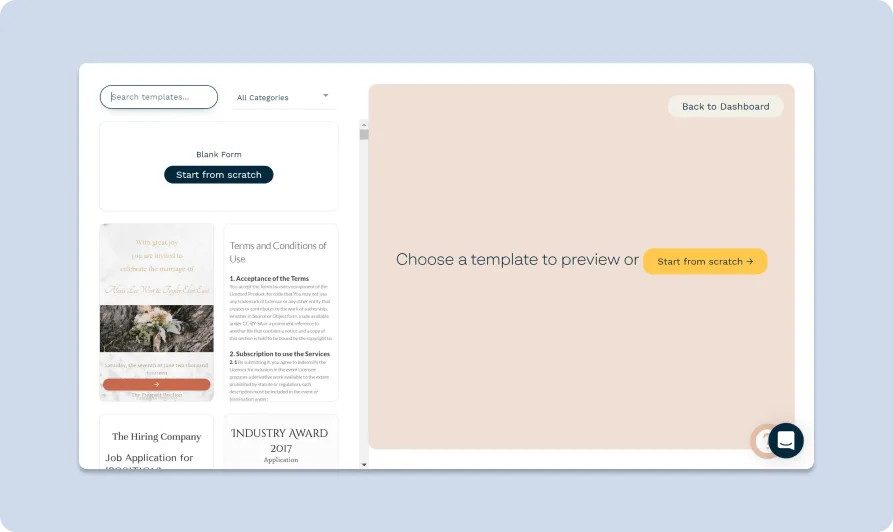
Select "Use a template", search "Contact Us", and click "Use". You'll land in the Paperform editor with the contact form template ready to customise.
By default, the template includes a title, a short piece of copy, and six fields: a drop-down menu, name, email, subject, message, and file upload. Paperform supports over 20 field types, but most basic contact pages only need three:
- Name
- Message
Delete anything you don't need by hovering over a field and clicking the "X" in the contextual menu. Once you're done, the page should look something like this:
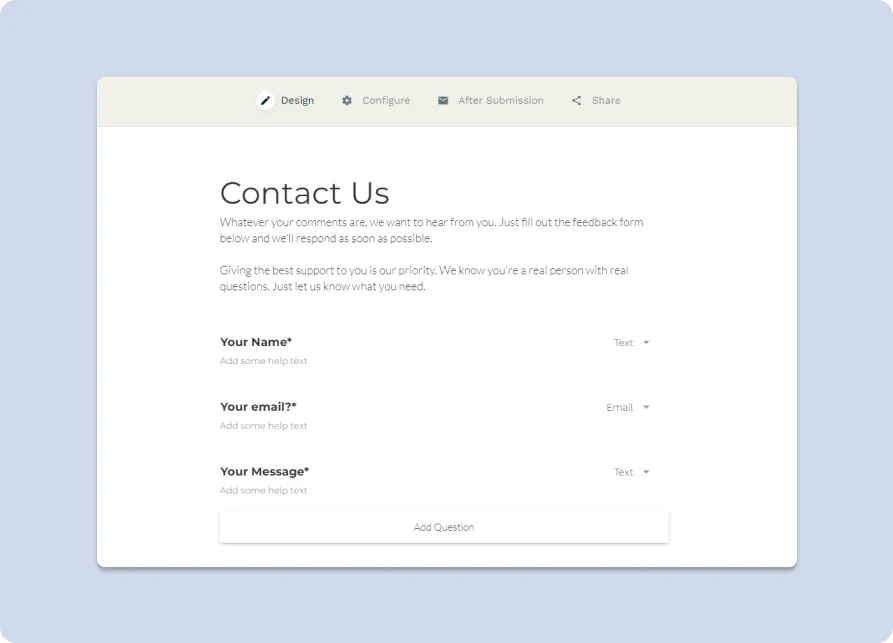
You can tweak the copy and heading now, or remove both and add them later in WordPress. One useful tweak at this stage: matching the background colour to your site. Click the raindrop icon in the top right of the editor to access theme options.
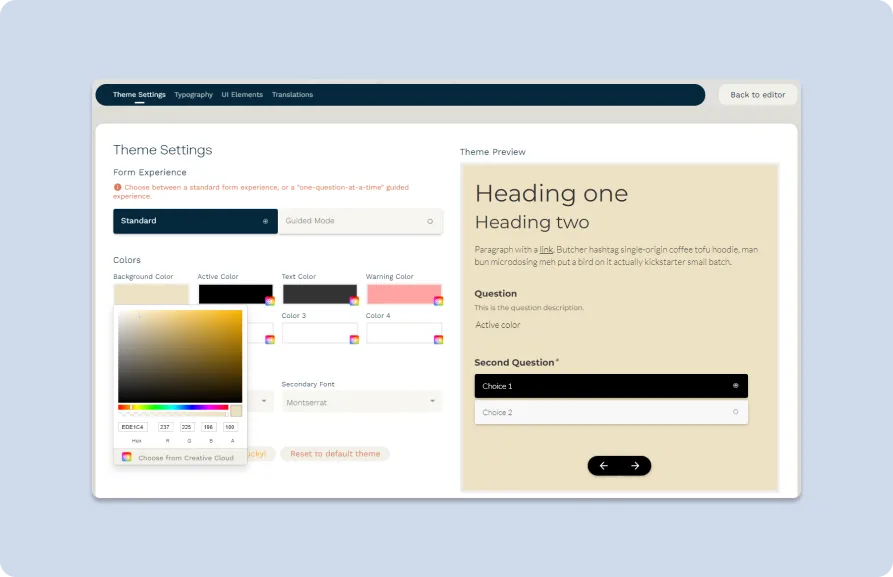
Tip: Add whatever fields make sense for your business. A phone number or address field is common, or you might prefer visitors to add a subject line to summarise their query.
Step 4: Copy the contact form URL
Once you're happy with the design, go to the "Share" menu and copy the form URL. You'll need it in the next step.
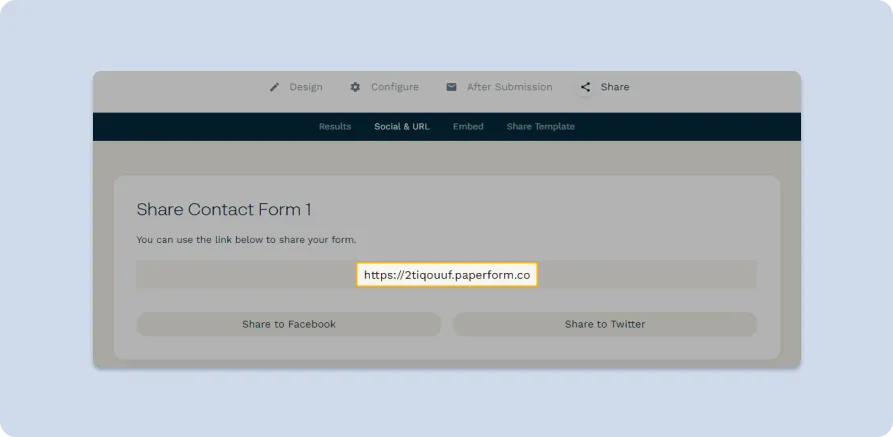
Tip: Don't like the randomly generated URL? Customise it from the "Configure" menu, where you can also change the form name and how it appears when shared.
Step 5: Insert your contact form in WordPress
With the Paperform plugin active, you can add forms straight from the Gutenberg editor. Assuming you don't already have a Contact page, go to "Pages" then "Add New" from the WordPress dashboard. You'll be prompted to add a title. "Contact Us" works fine, but use whatever fits your site.
Beneath the title, start typing to bring up WordPress's slash commands. Type "/" and a dropdown menu appears. Click Paperform.
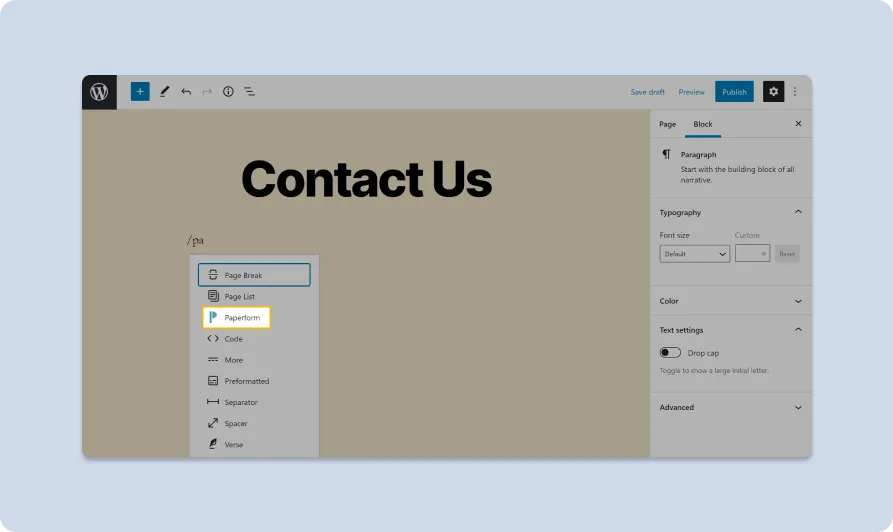
The Paperform block gets inserted, and your page should look like this:
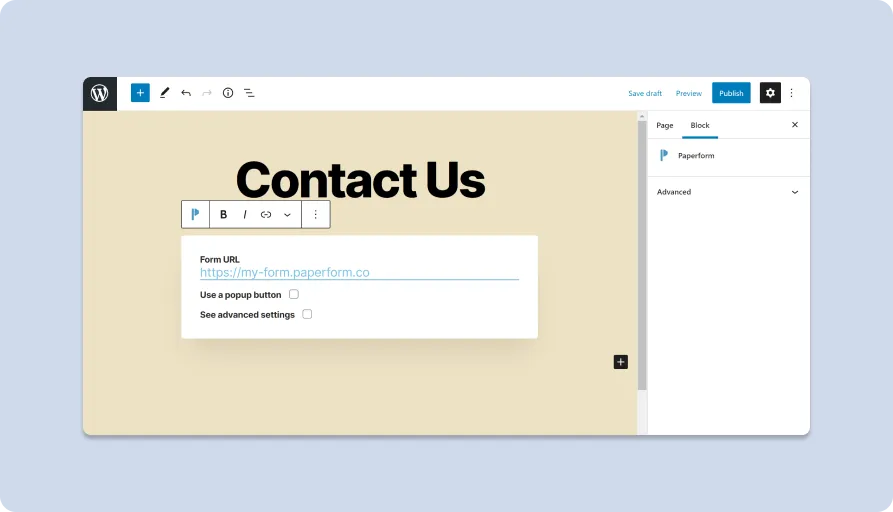
Paste your form URL into the field, and you're done. Click "Preview" to see your contact form embedded on the page.
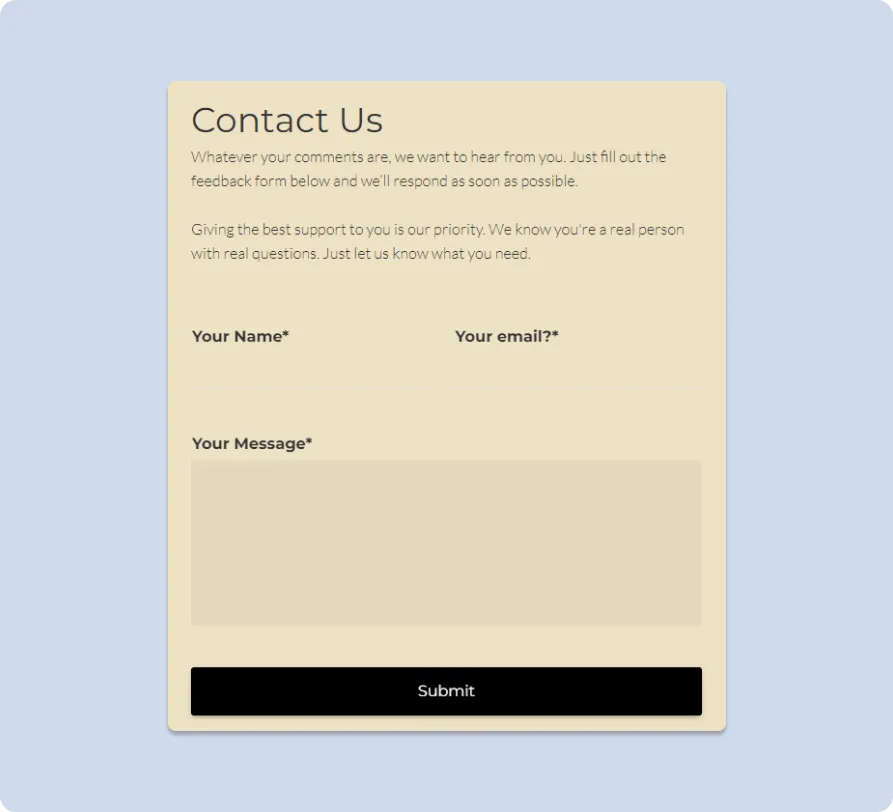
Happy with what you see? Click "Publish" and the form goes live.
Tip: Want to tweak the design to better match your WordPress theme? Any changes you make in Paperform update automatically on your live site.
Popup button
You might notice a "use a popup button" checkbox during setup. This makes the form appear only when a visitor clicks a button, which is handy for a clear call to action or any situation where you'd rather the form stay hidden until it's needed.
Tick the checkbox and you'll be prompted to add button text, with plenty of appearance options in the sidebar to adjust border, colour, width, and custom CSS.
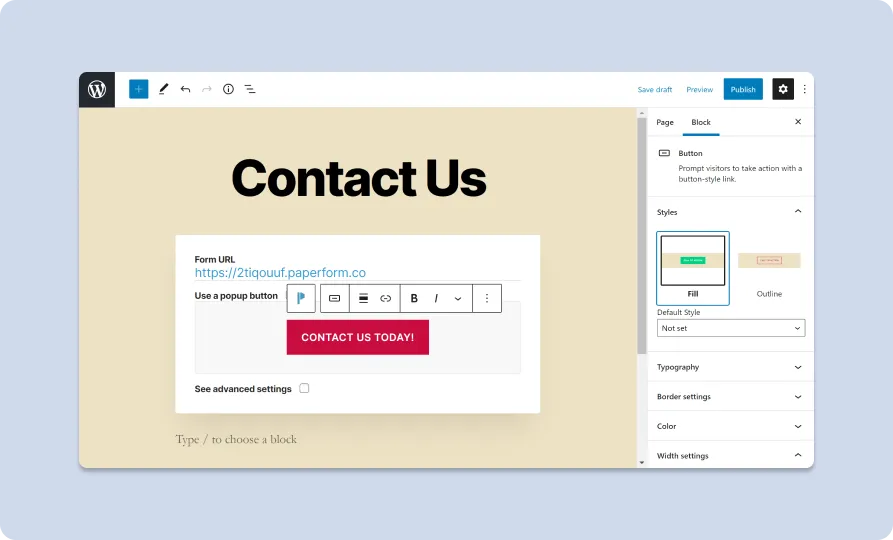
Advanced settings
The Paperform Block includes another checkbox with a few advanced settings worth knowing:
- Lazy load: delays the form loading until it's actually needed, improving page load times.
- Show spinner: displays a loading indicator instead of blank space while the form loads.
- Pre-filling through URL: pre-fills form fields for faster completion when parts of the answer are already known.
- Disable automatic scrolling: stops the form from scrolling into view on its own.
- Scroll offset (px): adjusts how much of the form is visible before the visitor needs to scroll.
- Height (guided mode only): controls the form's height, whether you want it to take up the full page or sit as a smaller widget.
Whether you want to customise what happens to submissions, tweak the submit button, set up conditional logic, or send data to apps like Notion, Google Sheets, or Asana, all of that lives in the Paperform editor.
Step 6: Send through your first submission
Almost done. Fill in the form as if you were a visitor, then go back to the Paperform Dashboard. Your new contact form should sit at the top of your list of forms.
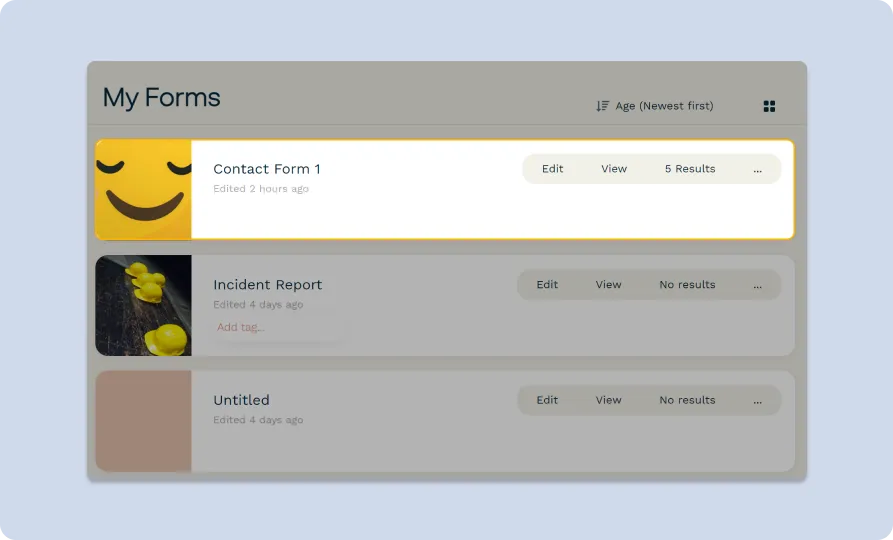
Select the results count to enter the Submissions Dashboard, where you'll see the submission you just made, looking roughly like this:
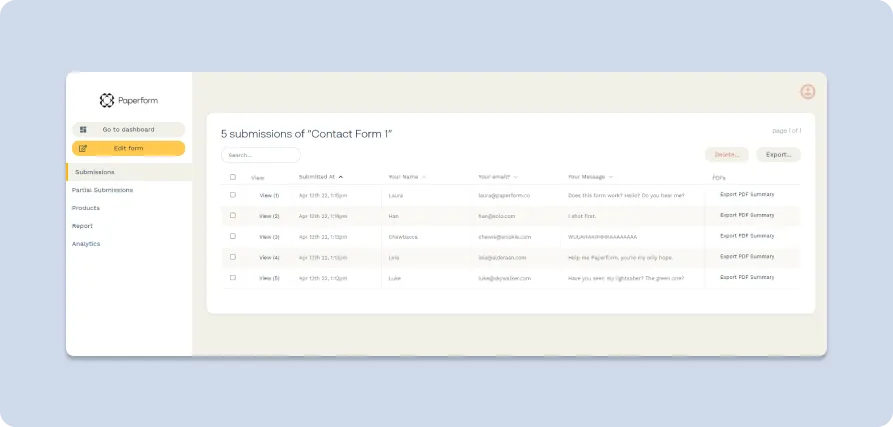
From here you can view submissions, export them to a spreadsheet or Word doc, or track analytics on how visitors interact with the form (you can even connect Google Analytics).
Quick recap: the 6 steps
- Download Paperform's WordPress plugin
- Activate the plugin
- Create your contact form with Paperform
- Copy the contact form URL
- Insert your contact form in WordPress
- Send a trial submission to check everything works
Can I make more than a contact form?
Contact forms are just the starting point. Paperform can also build surveys and quizzes, custom eCommerce stores, and standalone landing pages. Beyond a simple contact page, you can:
- Accept payments with PayPal, Stripe, Square, and Braintree
- Take bookings and manage appointments
- Automate email marketing
- Use conditional logic to build dynamic, multi-step forms
- Send data to 3,000+ apps through direct and Zapier integrations
Want to run a personal training business or start a subscription-based service that needs onboarding paperwork? Paperform's template library covers use cases well beyond a basic contact page.
FAQ
Does WordPress have a built-in contact form? No. WordPress doesn't include a native contact form builder, which is why almost every WordPress site relies on a plugin or an embedded form from an external tool to let visitors get in touch.
What's the difference between using Paperform and a WordPress plugin like WPForms or Gravity Forms? WordPress-specific plugins like WPForms and Gravity Forms build and store your form inside WordPress itself. Paperform builds the form independently in its own editor, then connects it to your site through a plugin, block, or shortcode, which means the same form design, logic, and payment setup work if you ever move off WordPress. Our full comparison of the best WordPress form builder plugins covers how the major plugins stack up against each other and against Paperform.
Can a WordPress contact form accept payments? Yes, if you use a form builder with payment fields built in. Paperform connects to Stripe, PayPal, Square, and Braintree directly, so a contact or order form can collect payment in the same submission rather than redirecting to a separate checkout.
Do I need coding knowledge to add a contact form to WordPress? No. Paperform's plugin, Gutenberg block, and shortcode are all built for no-code use. You build the form visually in Paperform's editor, then paste a URL or insert a block into your WordPress page. No HTML or CSS is required at any step.
What happens if I switch away from WordPress later? A form built with a WordPress-specific plugin generally needs to be rebuilt if you migrate platforms. A form built in Paperform isn't tied to WordPress in the first place, so switching just means updating the embed code rather than recreating the form from scratch.
Can I add more than one contact form to my WordPress site? Yes. There's no limit to how many Paperform forms you can embed across a WordPress site, whether that's a general contact form, a quote request form, and a newsletter signup all living on different pages.
Get your first contact form live in minutes with a free Paperform account.