How to create a registration form in HTML

/ 15 min read
Eliza Frakes

If you’ve found yourself here, you’ve probably hit some roadblocks while trying to create a registration form in HTML. Don’t worry: you’re not alone. Coding even the simplest of registration forms in HTML can be a time-consuming, often frustrating process.

HTML5 is the standard code used to make most web pages work. It's the language of the internet. But like any language, you’ll need to work hard (and get lost a few times) to become fluent.

We can’t get you to HTML fluency in 3,000 words. But we can give you the basic information you need to create a simple registration form for your website. In this post, we’ll do just that, and offer you an easier, more customisable no-code solution.

Summary

Here's a summary of how to build an HTML registration form. If you're more of a visual learner, we've also got a video tutorial below.

  1. Create a new HTML file and open it in a text editor.
  2. Inside the body element, create a form element with the action and method attributes set. (The action the attribute specifies where to send the form data, and the method attribute specifies how to send it).
  3. Create a label element for each field you want the user to fill out. The label should have a for attribute that matches the id of the corresponding input element.
  4. Inside each label element, create an input element with the type, id, name, and placeholder attributes set. The type attribute specifies the type of input (e.g. "text", "email", "password", etc.), the id attribute provides a unique identifier for the input, the name attribute specifies the name of the input field, and the placeholder attribute provides a hint for the user about what to enter in the field.
  5. Add a submit button to the form to allow the user to submit their information.
  6. Use CSS to style the form elements and make the form visually appealing.

Make your life easier by signing up to Paperform, which empowers you to build beautiful, smart forms in seconds without any code.  

Want to build forms with no-code?

Start your 14-day free trial now. No credit card needed.

Creating an HTML registration form in 6 steps

Here’s how to create a simple HTML form in six steps—code included. Read on for a step-by-step walkthrough, or check out the video below.

Step 1. Choose an HTML editor

Just like you need a word processor to create a text document, you need a text editor to create HTML code. These development tools convert the weird and wonderful code you type into a registration form.

If you’re looking for the simplest solution, you could always write out your code in TextEdit on a Mac and save the file as a web page. This won’t give you any frills or additional features, but it’ll get the job done. Go to Format > Plain Text to make sure TextEdit doesn’t alter your symbols.

If you want a designated HTML editing tool, there are dozens (if not hundreds) to choose from. There’s no “best” option, but there are a few key features to look for if you’re going to download a new tool.

1. Error detection: Automatically highlight syntax errors to make fixes easier.‌
2. ‌Auto-completion: Suggests relevant HTML elements based on previous changes (saves you a bunch of time with long code).‌
3. ‌‌Syntax highlights: Applies colours to different HTML tags based on certain categories to make it easier to read and sort your code.‌
4. ‌Search and replace: Locate and overwrite all instances of a particular code rather than editing each individually.

If you're really getting into coding there are a few more features to look out for, but for making a basic registration form these four should be more than enough.

Now when it comes to picking an app, the choice is yours. There’s no right answer. Want something that you can use in your browser? Try Codepen. Barebones? Notepad++. A minimalistic UI and intuitive input field? Sublime Text all the way.

Our co-founder and resident code-geek, Dean, swears by VS Code.

"From a nerdy standpoint VS Code fits snuggly into Paperform's tech stack and has great remote development plugins that I love. It's great for HTML stuff too, and super customisable if you like your tools to look nice while still having all the functionality you need.

If you’re overwhelmed by the options, we recommend downloading a relatively user-friendly and free option like Sublime Text and learning as you go.

It’s worth noting that most HTML editors won’t come with any form templates—they just give you the blank page. When it comes to creating the form itself, the artistry is all on you.

Step 2. Create your HTML file

Time to get down to business. Open your text editor of choice, create a new file, and save it with the .html extension. You can label your form however you like, like bestformever.html.

Once you've signposted to the editor that you're creating HTML code, it should automatically generate the following code for you:

<!DOCTYPE html>
<html>
<head>          
      <title></title>
</head>
<body> 
    
</body>
</html>

Some editors won’t autofill. That’s okay. Just copy and paste the code above and you’ll get the same effect.

Step 3. Add basic text fields

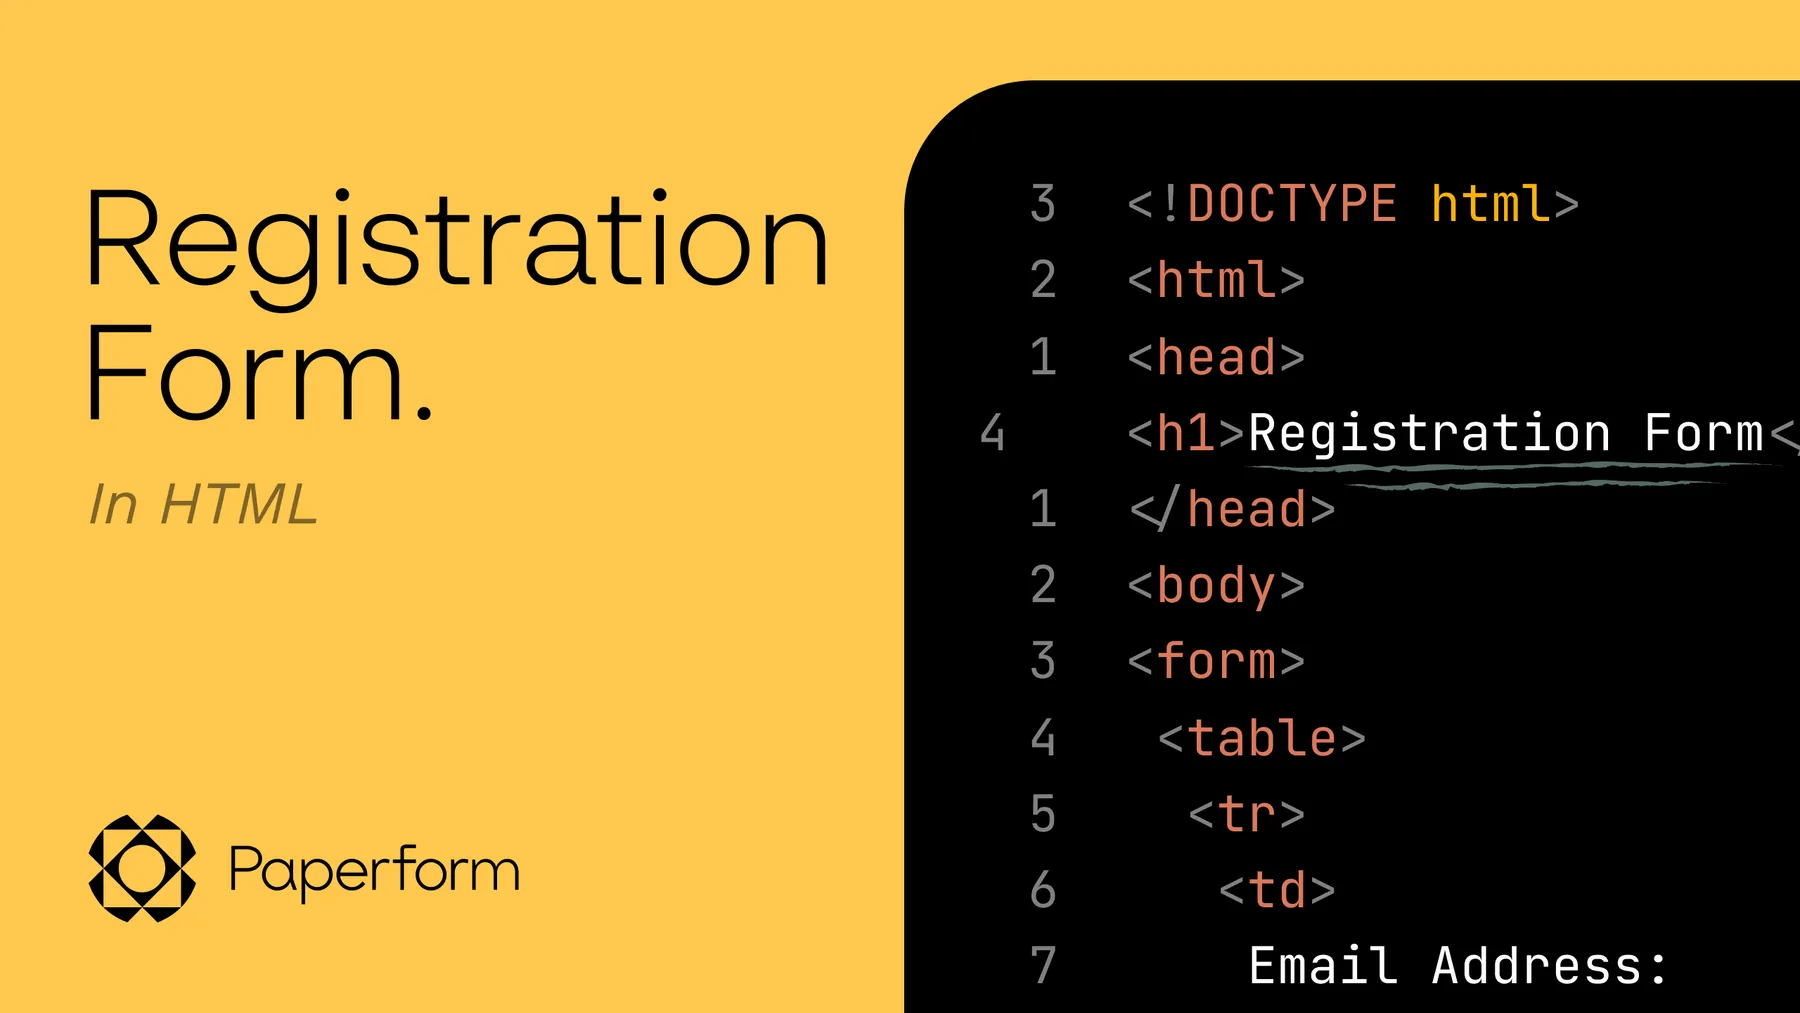
Alright. It's time to start adding the relevant code and turn that barebones HTML file into a registration form. Here’s the code we’ll be using.

<!DOCTYPE html>
<html> <head> <h1> Company Registration Form</h1> 
</head> 
<body> 
<form> 
<table> <tr> <td> Email Address: </td> <td> <input type=”text” email=””> </td> </tr> <tr> <td> Password: </td> <td> <input type=”Password” name=””> </td> </tr> </table> 
</form> 
</body> 
</html>

If you’re new to HTML, that might just look like a heap of letters and icons. You don’t need to understand what they mean, but troubleshooting is quite a bit easier if you have a handle on the basics.

We’ll break them down below if you’re interested. Feel free to skip ahead if not.

An HTML form is made up of form elements These are things like text boxes, radio buttons, checkboxes and dropdown menus that make it possible for folks to interact with your live form.

Each element has its own specific tag–that’s the word in between the chevrons. For example, the HTML <form> tag defines your code as a form, while <textarea> can be used to collect user inputs.

These elements are like shoes: they always come in pairs. All tags you want to include in your form must be inserted between the open <form> and closed </form> tags.

That’s the SparkNotes. The basic HTML code (above) will output something that looks like this:

Simple registration formImage Source: Paperform

So how did the magic happen? The tag <tr> tells your form to arrange the responses in a row, while <td> (which stands for table data) signposts that you want to capture whatever respondents type. In this instance we added two fields for simplicity's sake:

  1. Enter email address
  2. Enter passwords

In terms of the form itself, let’s be honest. It’s not winning any design awards. Unless you spend the time learning the ins and outs of HTML, your registration form will look pretty drab. Don't shoot the messenger.

Step 4. Add additional fields

Emails and passwords are a good start, but most businesses need a little more from their registration form. Luckily, once you know how to add one field, adding another isn’t too hard.

Your options are diverse. You can add an image, a radio button, or an open text field based on what input you choose. Just copy the code below and insert the input type you want between the chevrons.‌

<tr> <td> Email Address: </td> <td> <input type=”text” email=””> </td>

If you’re not sure how to label your input, W3Schools has a great list to guide you. For registration forms, you might consider adding the following fields.

  • Name
  • Username (if different)
  • Password
  • Email address
  • Phone number

Selecting the correct input type is crucial. It tells the form how the text should be displayed on the screen, so if it’s done incorrectly, you’ll get an error message.

Step 5. Add placeholders

Placeholder text lives inside your form fields and prompts respondents to answer in a particular way. It's mainly used as a nudge in the right direction, but it's also a useful strategy to make forms more engaging or add a bit of flair.

Let's say you're adding a name field to your form. You could type "insert name" and be done with it, or you could spruce things up by adding "Bruce Wayne" as placeholder text. It adds a bit of personality and makes it clear to respondents how they should interact with the field.

It's fairly simple to add placeholders to your HTML registration form. After the input type, just insert "placeholder=" with the text you want to display.

<!DOCTYPE html>
<html>
<head>
<h1> Company Registration Form</h1>
</head>
<body>
<form>
	<table>
		<tr>
			<td>
				Email Address:
			</td>

			<td>
				<input type=”mail”  placeholder=”Email” name=””>
			</td>
		</tr>
<tr>
<td>
				Password:
			</td>

			<td>
				<input type=”Password” placeholder=”Password” name=””>
			</td>
		</tr>
	</table>
</form> 
</body>
</html>

For this example, we’ve entered a placeholder for the email and password fields. When copy and pasting, feel free to alter these words to create your own placeholder text.

Entering this code will produce a form like this:

Registration form with placeholdersImage Source: Paperform

Not exactly the grand reveal you were expecting, right? Can you imagine a potential customer searching for your business on Google and being met with this page? Or sharing this on social media? Not ideal.

It's safe to say this kind of HTML login form wouldn't exactly encourage clients to sign up for your business. When all is said and done, you might look at your HTML form and have one question on your mind…

Why is my HTML form so ugly?

So you’ve got an ugly form. It happens. In the grand scheme of things, beauty isn’t everything. But when it comes to enticing clients to fill out your online form, it kinda is.

At the end of the day, a clunky form doesn’t entice people to fill it out. And that's an issue. HTML forms tend to be boring, difficult to customise, and a chore for form makers and takers alike.

This is down to the simple nature of HTML. It's a framework that helps complete the necessary form actions. It’s a practical language—it’s not concerned about bells and whistles.

So what if you want a few bells and whistles? The best option is to use an online no-code online form builder like Paperform to do the heavy lifting for you.

You can build beautiful registration, feedback forms, booking pages, and even fully functional ecommerce stores, all without writing a lick of code. They’ve got the backend power you need to gather and organise all of your data and the design tools you want to make it look snazzy. Win-win.

Form a better life now.


But maybe you're really set on the whole HTML thing (or you're just a glutton for punishment). Either way, if you're really committed to your HTML registration form you can improve its looks by using CSS.

Step 6. Customise your HTML form with CSS

CSS is a programming language you can use to style form elements in an HTML document. It customises how HTML elements are displayed on the screen and lets you change nearly anything.

There’s just one catch: you have to know how to do it. If you’re willing to learn the code, you can adjust font colours and opacity, add images, link to another page with a <href> tag, and do a lot more. If you want to know all your options, we recommend W3School's CSS Reference list.

For the sake of our tutorial, we’ll be giving our HTML registration form a brief makeover with CSS. We’ll customise the text colour, and font style and tweak the margins for an all-around (slightly) better appearance.

Important: The most common way to add CSS to an HTML page is with an external style sheet file linked with the element. This style sheet is created in the same text editor and saved with the “.css” extension.

To add colours, you’ll need to find and add your colour code. The one we used is highlighted below. You can use any online CSS colour picker tool (like this one) to find the HEX code that matches your colour scheme.

Here’s the code we’ll use to customise our form.

table {
	font-family : Arial, Helvetica, sans-serif;
	font-size : 100%;
  font-weight: bold;
  background-color: white
}
 h1 {
   color: #ea503f;
   font-family: Arial;
   text-align: center
 }

Pop that at the top of your CSS style sheet and your form will end up looking like the one below. It's not much, but it’s a start. You can adjust the background colour and font however you like by adjusting the code above.

Registration form with some CSSImage Source: Paperform

Challenges of creating a registration form in HTML

If you’re willing to learn how, it is possible to gather basic contact details with HTML. But just because you can do it, doesn’t mean it’s the most efficient way. You could fill a swimming pool with an eye dropper. But why would you?

Unless you’re already a coding wiz, you’ll likely hit a few roadblocks while making even a basic HTML contact form.

1. The setup is tedious and confusing

This is the most obvious gripe of the bunch. Coding, without prior understanding, is no easy feat. There’s a reason the no-code movement has been on the rise for years.

Learning how to create even the most basic contact form from scratch requires multiple tools, tons of trial and error, and a lot of time spent getting to grips with the language of HTML.

It’s a hassle. And when you’re just looking for a quick fix to embed on your website, the process can be a lot more trouble than it’s worth.

And that’s before you get into how to access, organise, and funnel the data you collect from your registration form. Without built-in integrations or data analysis, you’ll be on your own when it comes to figuring out how to make sense of your form submissions.

2. The results are boring

When you do manage to finish your simple contact form, you might be disappointed in your results. Amateur HTML forms tend to be dull. They all look about the same: mostly black and white, filled with the same old form fields, with no real branding to speak of.

Unless you know how to customise thoroughly with CSS, they’re going to stay looking dull. And let’s face it: learning one coding language is hard enough as it is. Learning two just to be able to adjust the colours of your form is next to impossible. Who has time for that?

3. There are no templates

Nobody likes the dread of a blank page. Form building is no different. Especially for those new to coding and web design, creating an entire form from nothing is intimidating.

Most text editors don’t come with any templates, which means it’s up to you to create everything from the first question to the final submit button. That’s a lot of work for a simple registration form.

Make beautiful registration forms effortlessly with Paperform

Learning how to code can be fun, empowering, and creative. But if you plan on using it to create long-term digital solutions, like creating a registration form for your business, HTML may not be the best solution.

Think of learning to code like learning how to woodwork. In a few weeks, you might get good enough to build yourself a simple table. But if you started tearing down the walls by yourself, your partner might wield the hammer on you.

If you’re not confident you know how to create, troubleshoot, and access all of your form data using HTML and CSS, you shouldn’t use it for your business. It’s just not worth the headache.

Luckily, you don’t have to. There are loads of online, no-code tools available to help small business owners create powerful, beautiful online solutions without ripping their hair out.

Of course, we think Paperform is the best of the bunch. We may be biased, but we really do believe it. Paperform was designed to help people exactly like you: scrappy entrepreneurs who crave the freedom and creativity coding provides, without the hassle of learning to code.

And in the past five years, we’ve gotten pretty good at doing just that. You can use our intuitive, doc-style editor to create contact forms, registration forms, booking pages, ecommerce sites, quizzes, surveys… we could go on all day. If it collects data online, you can build it in Paperform.

Paperform solves all of the roadblocks you’ll hit when building a registration form in HTML.

  • It’s entirely no-code and easy for anyone to use. (Yes, even the tech-averse).
  • It’s anything but drab. Paperform integrates with Unsplash, Giphy, and Adobe Creative Cloud so you can easily add your branding and personality to your form. Our doc-style editor has over 25 field types to choose from, a built-in image editor, and an intuitive design portal that makes tinkering a breeze.
  • There are over 650 custom-made templates to choose from, each fitted to a specific use case. You can pick a template because it fits your use case, or just because you like the style. Once you pick your starting point, you can customise your template as much or as little as you want.

Just open up the editor and click anywhere to start building your form in minutes. Paperform is designed to be intuitive, but if you get stuck, you’re not alone. Our live customer support team is there to help at any time. Just click on that blue chat icon to find out.

We integrate with over 3,000 of your favourite apps to share form data across platforms and automate everyday processes, from updating customer profiles in your CRM to subscribing a respondent to your email newsletters. With all the design tools and advanced features you need, you can create a form your clients will actually want to fill out.

Once you’re happy with the registration form you’ve created, you can host it as a standalone site with a custom URL, share it on all your platforms, or embed it into your pre-existing site.

And when it’s time to analyse your results, we’ve made it easy. Just hop into our built-in analysis portal to view all your form responses and go over helpful visualisations of your form data.

Of course, you could also turn on automatic emails to have each response sent to you immediately, or organise the answers in the software of your choice automatically. You can also have email messages sent to your respondents automatically to confirm that you’ve received their information.

Registration forms are just the beginning of what you can make with our digital suite of tools. But don’t take our word for it. Give it a go yourself with our 14-day free trial, no credit card required.

Save time, save headaches, and rest easy knowing your registration form will work great and look great doing it. It’s possible with Paperform.

Related reading


About the author
Eliza Frakes
Paperform Contributor
Eliza Frakes is a freelance copywriter. When she’s not writing for the Paperform blog, she’s probably writing a play (or acting in one), swimming in the ocean, or taking her very cute dog on a hike.

Form a better life now.

Get your 14 day unrestricted trial
No credit card needed.
Hiring
A guide to successfully hiring your first employee

Hiring your first employee is an equally exciting and scary step as a business owner. This guide has...

Kat Boogaard
17 May 23
Apps & Integrations
The 8 best Linktree alternatives in 2023

The 8 best Linktree alternatives, from bio.fm to Paperform (yep, really!)

Lee Nathan
12 May 23
Inside Paperform
Paperform People: David Weinberger, Head of Growth

Take a look at David's routine, how he balances family and work, and what he loves most about workin...

Jack Delaney
12 May 23
marketing
Email capture: best practices and must-have tools

Email capture is the process of collecting a person’s email address. Here’s how to do it right, alon...

Kat Boogaard
10 May 23