It's easy to add Meta Pixel to any of your forms! Follow the instructions below to get started.
Setup
-
Go to the Meta/Facebook Events Manager.
-
If you already have the Pixel you'd like to use, move on to step 3.
To set up a new Pixel:
- Click "Connect Data Sources" (that's the green plus icon to the left).
- Choose "Web," and then click "Connect."
- Add a name for your Pixel, then click "Create Pixel."
- Enter your Paperform URL, then click "Next."
- Choose how you'd like to connect, then click "Next" to finish the setup.
-
Click "Data Sources" from the left menu.
-
Select the Pixel you'd like to use.
-
Click on the ID number under "Pixel" in the "Overview" section to copy it.
![Screenshot of a page in Meta Events Manager. The Pixel ID is highlighted under Data Sources → [selected Pixel] → Overview.](https://img.paperform.co/fetch/f_auto,w_1400/https://d3gw2uv1ch7vdq.cloudfront.net/img/1.1-copy-pixel-id.png)
-
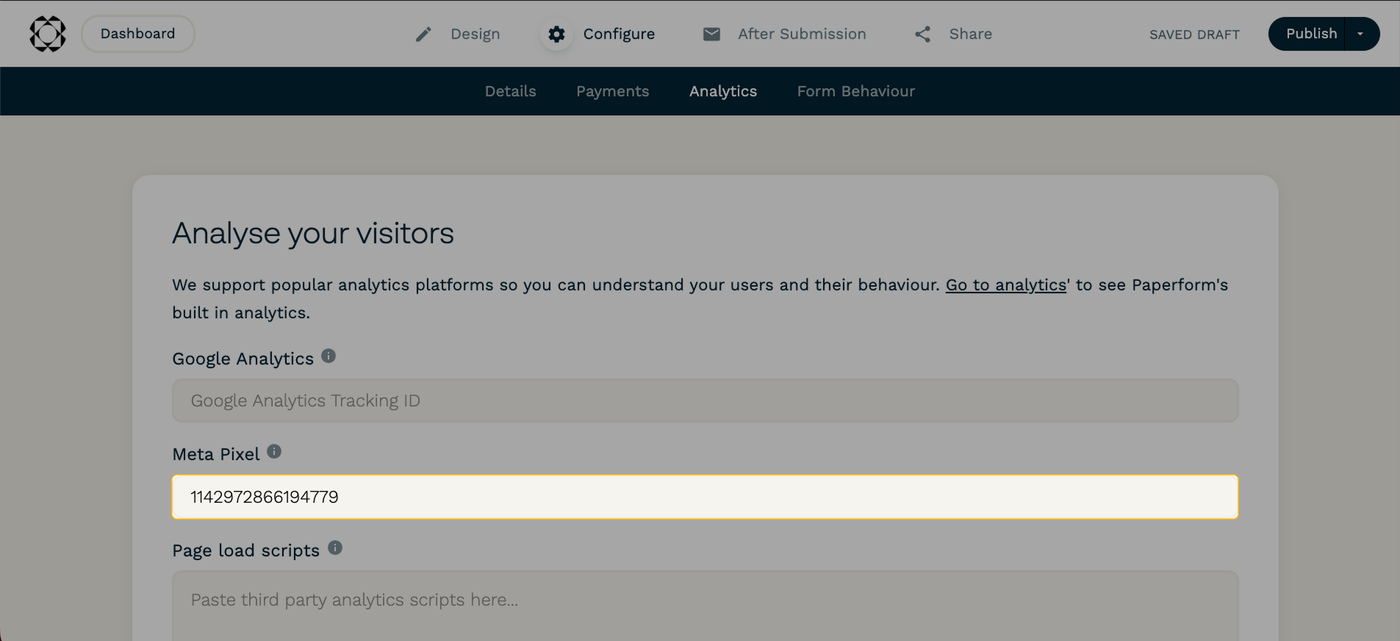
In Paperform, edit the form that you'd like to connect.
-
Go to Configure → Analytics, then paste your Pixel ID under "Meta Pixel."
-
Click the Publish button in the upper-right hand corner.
Testing the connection
If you'd like to test the connection, head back into the Meta Events Manager. Go to "Data Sources," select your Pixel, and then click "Test events." You can enter your form URL under "Test Browser Events" to make sure that it's working correctly.
As you interact with your form page, you should see events come through to your Events Manager in real time.
Events
Paperform sends through some standard and custom events for the different ways that a visitor can interact with your form. The following events are currently supported:
Standard Events
- ViewContent: Triggers when the form is viewed.
- InitiateCheckout: Triggers when the checkout is opened.
- Purchase: Triggers when the user submits a form that has a payment.
Custom Events
- SubmittedForm: Triggers when the form is successfully submitted.
- StartedSubmission: Triggers when the user begins filling out the form.
When events are triggered by your form and other connected pages, they will appear in the "Overview" section of "Data Sources" in the Events Manager.
Conversions
If you like, you can use custom conversions to filter and analyze patterns in the events coming through from your form. Select "Custom Conversions" from the left navigation menu, then click the "Create Custom Conversion" button to get started.

Once added, events that meet the specific conditions of your conversion will appear here in the "Custom Conversions" tab of the Events Manager.
Troubleshooting
Meta offers a Chrome extension called Pixel Helper, which you can use to test the Pixel on your form page and improve performance. You may also wish to review some common analytics issues, as well as special considerations for embedded forms.
If you're still having trouble, feel free to reach out to the Paperform support team using the live chat icon in the bottom-right corner of the screen, or email us at support@paperform.co.