Paperform's built-in scoring feature is great when you need to keep track of a single running score, like for a test with correct and incorrect answers. However, certain types of quizzes require you to tally up a separate score for each potential result, and then see which one scores the highest. In this case, you'll need to set up a calculation field to handle the scoring instead.
Calculations are pretty open-ended, and there are many ways to score a quiz. This article will go over one reliable method from start to finish, so this is a good place to start if you're not sure what to do.
1. Set up your quiz questions
Before setting up any scoring or results, you'll need to configure the questions themselves. For this method, we're going to use multiple-choice questions. Each question should feature one answer option associated with each personality type or possible result.
While setting up your quiz questions, decide on a consistent order to list the options in the editor. The first option for each question should always be associated with a specific result, the second with the next result, and so on.
Despite this, you can also turn on the setting "Randomize option order."
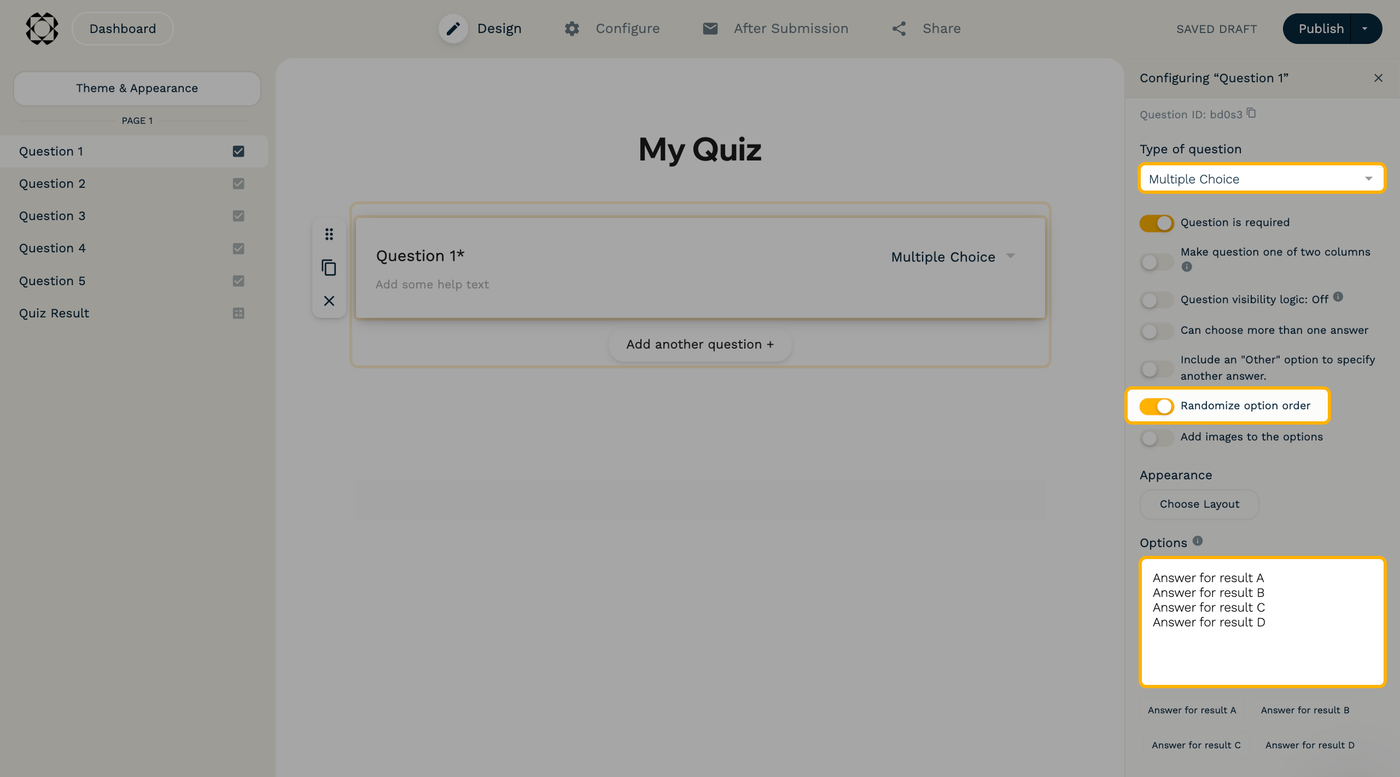
The "randomize" setting will shuffle the answers on the live quiz, but the original order still matters for scoring. Our calculation will keep track of the index of each selected answer, which is a number that represents its original position in the question's configuration.
Once all of your questions are configured, click the "Publish" button in the top-right corner.
Next, it's time to set up the scoring.
2. Set up the scoring calculation
Calculation fields can be used to perform all kinds of math and logic using your form's answers. We won't go into all of the technical details here, but you can reference the Calculations Guide if you'd like to learn more about how this works.
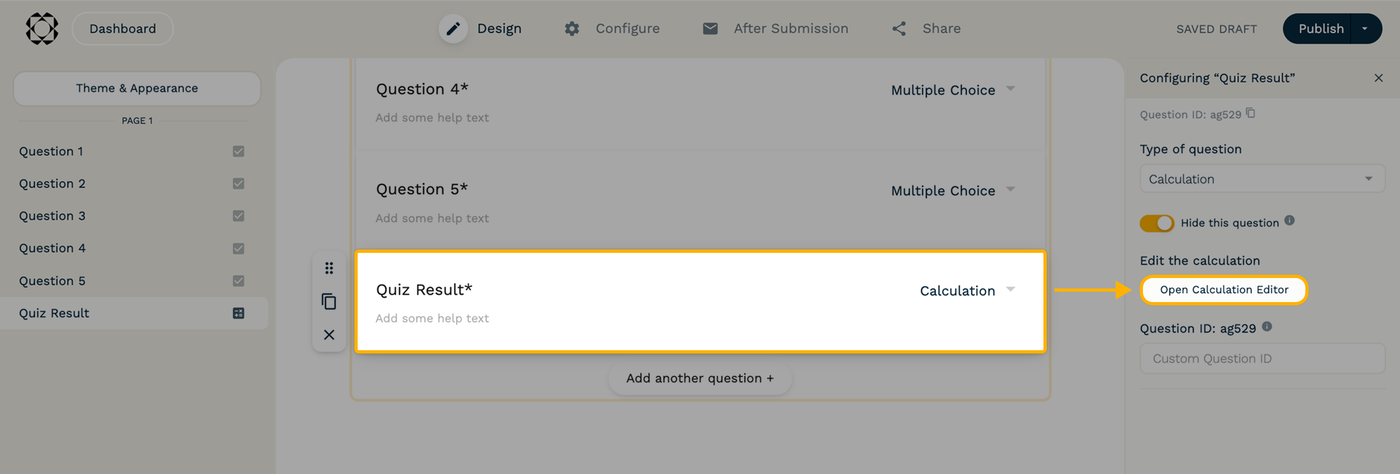
In our case, we'll create a hidden calculation to score the quiz and tell us the result. Add a new question to your form, and then change the type from "Text" to "Calculation." Select the new field, then click the "Open Calculation Editor" button in the right sidebar.
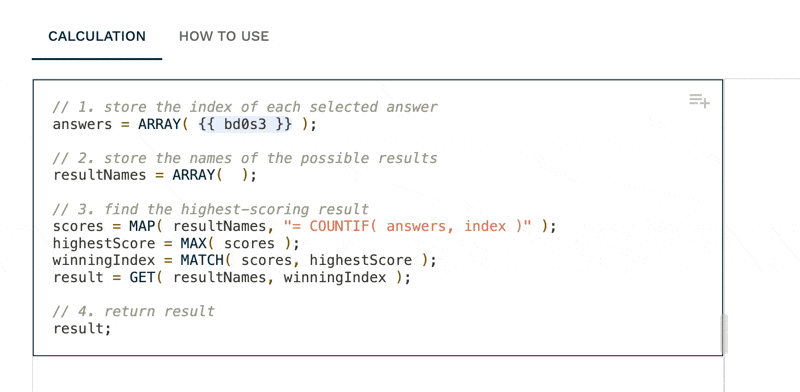
Next, copy the following calculation template and paste it into your calculation editor:
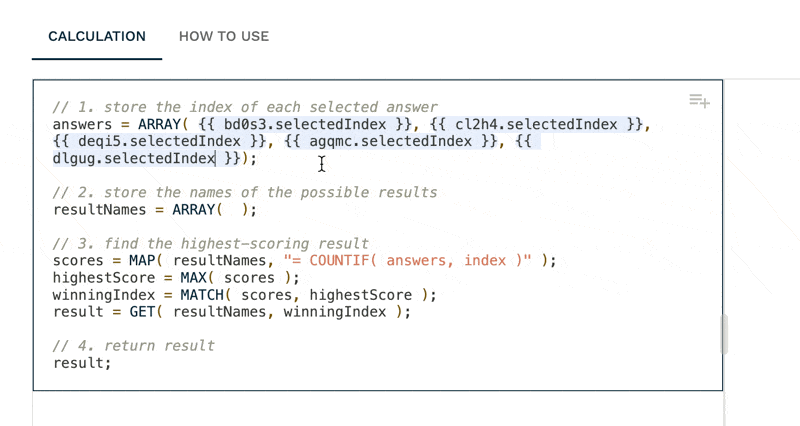
// 1. store the index of each selected answer
answers = ARRAY(  );

// 2. store the names of the possible results
resultNames = ARRAY(  );

// 3. find the highest-scoring result
scores = MAP( resultNames, "= COUNTIF( answers, index )" );
highestScore = MAX( scores );
winningIndex = MATCH( scores, highestScore );
result = GET( resultNames, winningIndex );

// 4. return result
result;
The scoring logic is already configured for you, so all you have to do is pipe in your form's answers and enter the the names of the possible results.
Let's start with the quiz answers. Click to place the typing cursor within the parentheses of the first array, toward the end of the line that begins with answers. Then, click the grey + icon in the top right and select the first question from your quiz. This will generate that question's ID inside of double curly braces.

Next, enter a comma and a space, and then select the second question from your quiz. Repeat this process until all quiz questions have been entered into the array.
You now have an array that contains every selected answer from your quiz. This is a good start, but what we really need is each answer's index. We can find these by adding a little bit of dot notation.
Inside of each set of curly braces, add the text .selectedIndex right after the question ID.
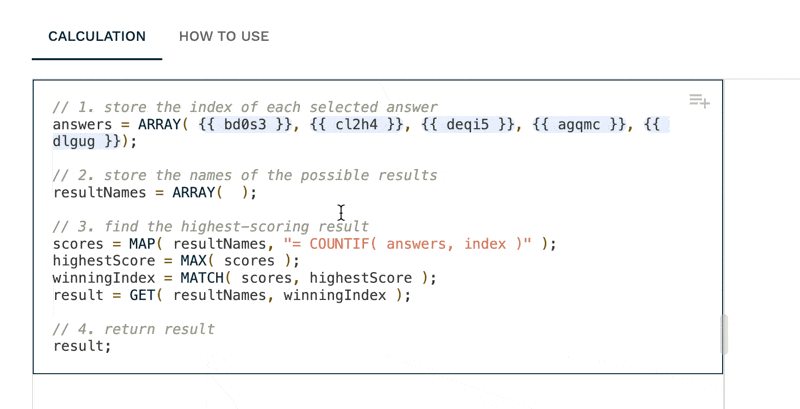
Looking good so far! Our calculation now has access to the index of each selected answer. Next up, we'll need to tell it what the possible results should be.
Proceed a couple of lines down to the next empty array; you can find this one in a line starting with resultNames. Once again, click inside of the empty parentheses.
This time, type in the name of the first possible result inside of quotation marks. Add a comma and a space after the quotes, and then repeat for the next result. Continue until all possible results are entered. These result names should be entered in the same order that you used for each question's options.
Please remember:
- The result names must be listed in the same order that you used when configuring the answer options earlier.
- Each result needs to be inside its own set of quotation marks.
- The commas between possible results must be outside of the quotation marks.
Be careful to get the syntax right, because the slightest typo could cause an issue with your scoring. Once your result names are set, you are all done with the scoring calculation. Let's move on to determine how the results are shown to the user.
3. Display the results
If your Paperform plan supports it, we recommend using dynamic success pages to display the quiz results—these let you conditionally show a different page after submission based on the calculation result. However, this feature is only supported on certain pricing plans.
If your plan does not support dynamic success pages, you can use conditional emails instead.
Using dynamic success pages
To configure your results pages, head to After Submission → Success Pages & Redirects, then toggle on "Dynamic Success Pages & Redirects." Click the "Add Page +" button to configure the first result page.
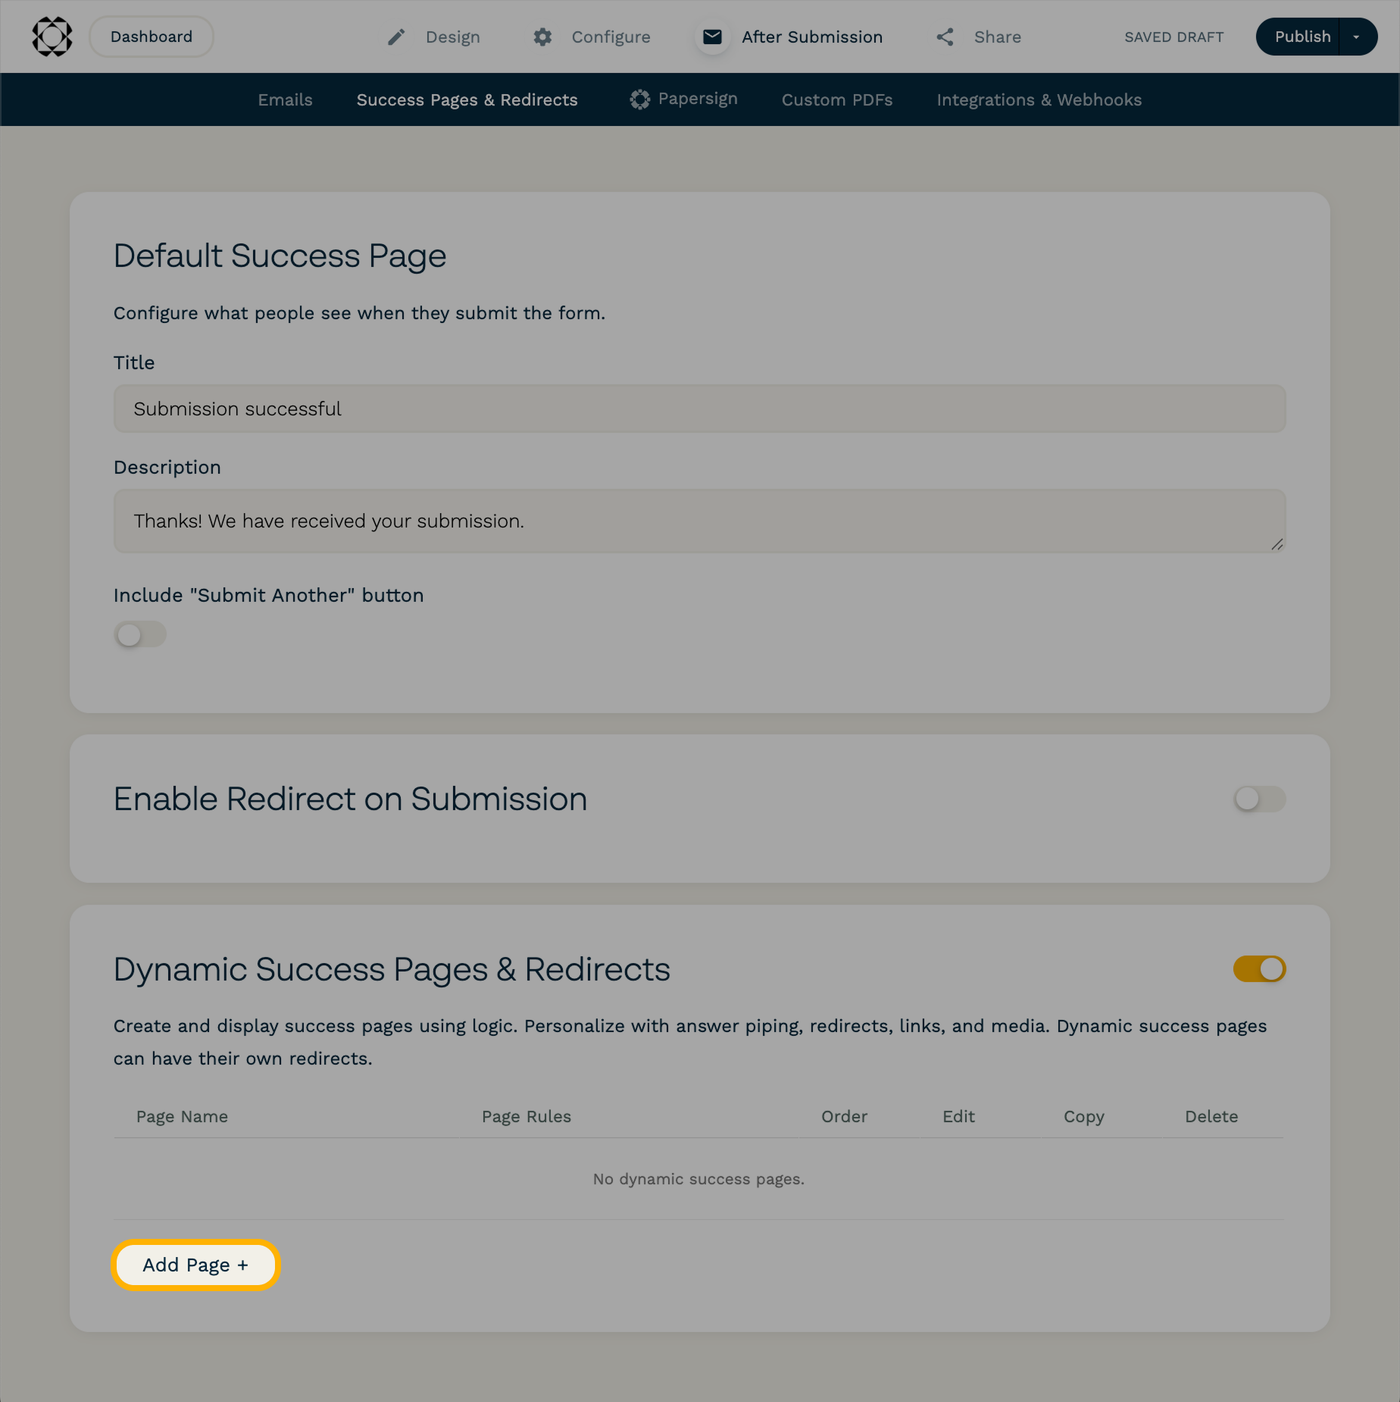
Now, you'll want to create a page that is associated with the first possible result.
-
Set the "Page Name" to the result that you are configuring. This is only for your own reference and it won't appear anywhere on the live form, but it helps to keep track of the different pages in the editor.
-
Toggle on "Page has conditions when it should be used." This automatically brings you to a page where you can configure the logic (or if you need to edit it later, you can click the "Configure Logic" button).
-
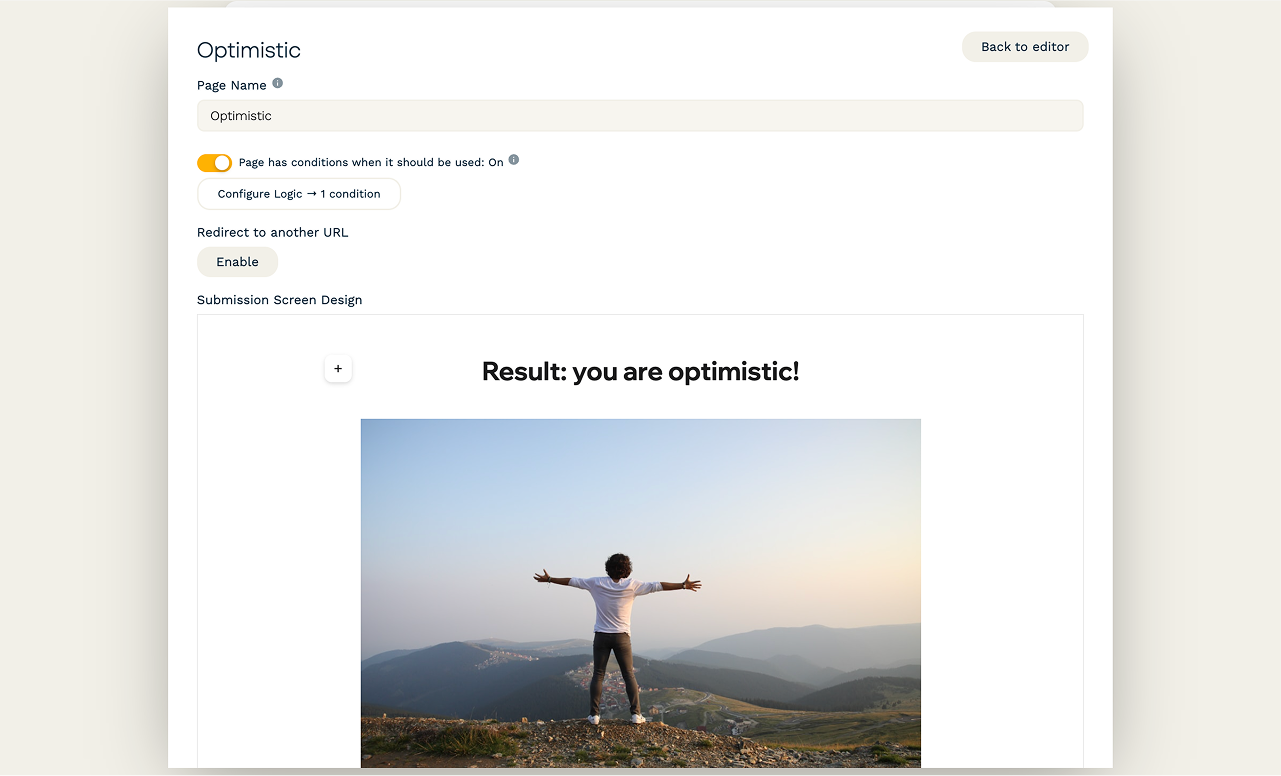
For the logic; set the "question" to your results calculation, use "is" for the operator, and then enter the name of the result as the answer. This name is case-sensitive, and it must exactly match the result as you entered it into the calculation earlier (but without the quotes this time).

-
Under "Submission Screen Design," design the page however you like.
When you're all done with the first page, click the "Back to editor" button in the top-right corner, then add the next page. Continue until you have a dynamic success page set up for each possible result.
Without dynamic success pages
If your Paperform plan doesn't support dynamic success pages, then you have a couple of alternative options:
- You could ask for the submitter's email address, and then send them an email containing their results after submission. The setup is similar to dynamic success pages, except that you'll create one custom email for each result, and then apply logic to each email.
- It would also be possible to display the results before the form is submitted. To do this, you can use page breaks with visibility logic instead of success pages. Please note that this would allow the visitor to see results without submitting the form, which could be an issue if you are using this quiz for lead generation.
4. Test it out!
From this point, your quiz should have everything it needs: questions, a result calculation, and a way to display that result to the submitter. It's time to test it out to make sure that everything works.
First, it's a good idea to test the calculation by itself without submitting the form. Select your calculation in the editor, then toggle off "Hide this question."
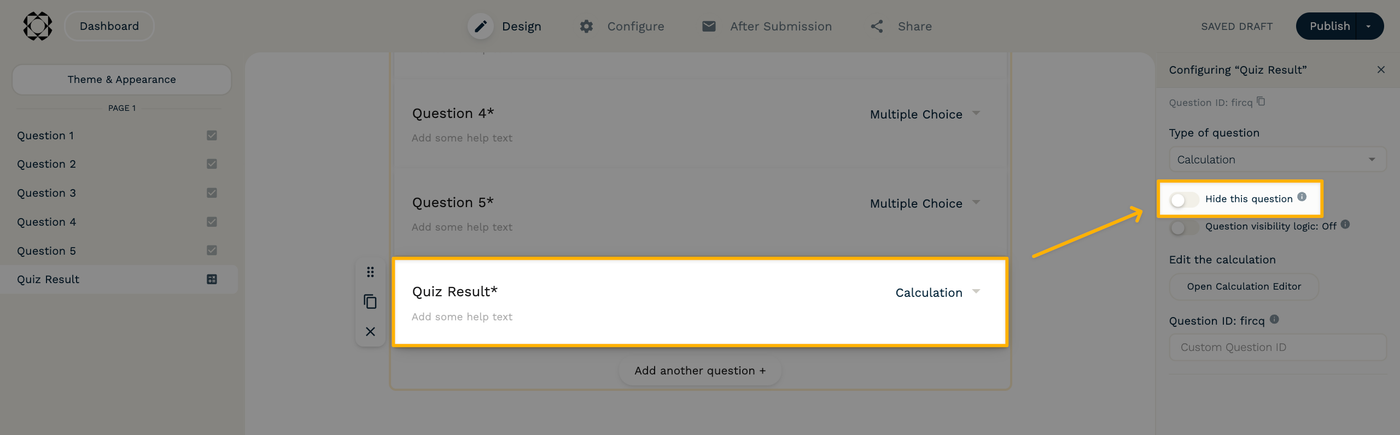
This will make it visible before submission. You can preview the form, then select different quiz answers and watch the result change in real time. If the result doesn't match up with the answers you've selected, then there may be a problem with your calculation.
Once you're satisfied that the calculation works, you can toggle "Hide this question" back on. From here, it's a good idea to save and publish the form, and then try sending through a few real submissions. Make sure that the results page or email that you see matches up with the answers you've selected too.
If anything isn't working as expected and you're not sure why, please feel free to reach out to our support team using the chat icon in the bottom-right corner of any Paperform page. You can reach us at support@paperform.co as well.